Announcement

Collapse
No announcement yet.

My Asymmetric Electrodynamic Machines

Collapse
X
 
  • Filter
  • Time
  • Show
Clear All
new posts

  • RPM's VS Force

    Originally posted by Hitby13kw View Post
    Went to bed a beaten man, but the sun is out this morning - we have checked my rider, all pulleys do spin free (Thanks for the tip Cornboy) but the belt is a bit frayed (its over 10 years old) starting my search for a replacement belt – actually would like to get a Lowes raven http://www.youtube.com/watch?v=O6UtGkZEfrc this is close to the electric we will make UFO - it should be an easy retrofit.


    As to my RPM it did seem a bit low but after watching your video (Thanks again for relisting it) the major difference between our setups is my lovejoy couplings to the generator were still connected when the test was made (will put that on my to-do list) . . . Our resistance per pair is about one ohm.

    Thanks for the continued help & support.

    Namaste

    Hitby13kw

    Hello Hitby13kw,

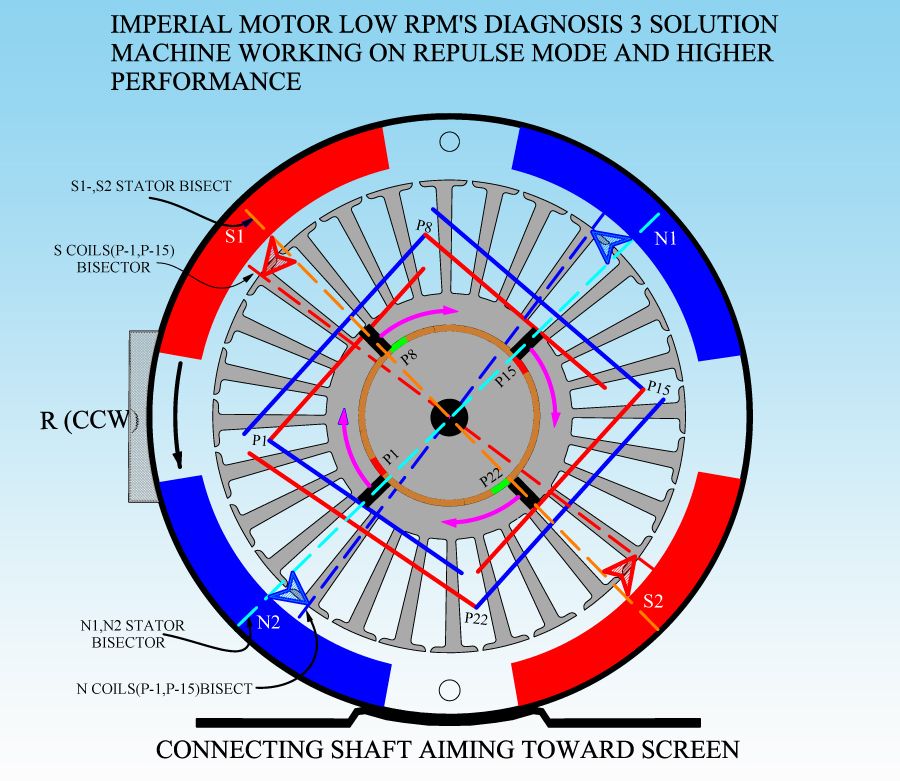
    In this type of Asymmetrical Machines, it is very important to have a pretty high RPM's at low feed...it means our machines are more robust...as Rotor Bisectors are "Firing", as close as possible to stators bisectors on the side of rotation at rotor end...this generates Stronger Throw Out Forces.
    This proper timing not only offers a good RPM's/Speed, but it is a sign that they are running much stronger when facing mechanical loads.

    In this Machines Speed/Force/Power run together as they are directly proportional...(while in Symmetry they are inversely proportional)meaning, a fast motor will generate a higher torque than a slower one with same feed.
    Try disconnecting your motor from Generator Head shaft...then test and compare.
    Your resistance is OK "about" 1.0 ohms...now, is it passing 1 ohm?...or below?
    Mine is from 0.6 to 0.8 per Pair.

    Regards


    Ufopolitics
    Last edited by Ufopolitics; 05-19-2013, 11:39 PM.
    Principles for the Development of a Complete Mind: Study the science of art. Study the art of science. Develop your senses- especially learn how to see. Realize that everything connects to everything else.― Leonardo da Vinci

    Comment


    • Level of Awareness

      Ufopolitics,

      Thanks for helping us all in expanding our level of awareness!

      This information can be directly applied to the asymetrical motor:

      Bob Proctor - Change your Paradigm increase your awareness 9 minute 26 seconds
      Bob Proctor - Change your Paradigm increase your awareness.mp4 - YouTube

      IndianaBoys

      Comment


      • crosstalk

        @JohnStone
        Just a quick question. With the multiple Monster setups, are there any possible additions needed between circuits to prevent any possible crosstalk such as interference from one to another circuit. I have not the tech. to know but Hitby and myself have seen a fet lock up when multiple circuits are involved when no problem with each befor or after when each run by its self.?
        Dana
        "Today's scientist have substituted mathematics for experiments and they wander off through equation after equation and eventually build a structure which has no relation to reality."
        Nikola Tesla

        Comment


        • FET's Crosstalk...

          Originally posted by prochiro View Post
          @JohnStone
          Just a quick question. With the multiple Monster setups, are there any possible additions needed between circuits to prevent any possible crosstalk such as interference from one to another circuit. I have not the tech. to know but Hitby and myself have seen a fet lock up when multiple circuits are involved when no problem with each before or after when each run by its self.?
          Dana
          Hello Dana, Hitby,

          First, I will suggest to check if the "lock up" is happening at the Gate Signal end (low Voltage side)...You will need to Scope probe/testing AND also to measure with a DMM each signal that goes to Fet's Gate while running Motor...and watching for an "over or under value anomaly" .

          Second, I will HIGHLY recommend to set per each Chanel/Drain from FET's to Motor Gates Ultra-fast Diodes,(meaning Four Diodes Total) blocking/rectifying all Positive reversed currents from coming back into FET's.

          Stress Test on FET's:

          Test all Four Channels/Drains from each FET's with Four 12V Automotive Incandescent/Halogen Bulbs, (Feeding Source off12Volt Battery, of course...so bulbs won't blow out..) instead of Motor Gates, so, the Positive is common and goes to all bulbs...and one channel from Drain to each independent...and see if they stand the speed of pulses without locking any FET's...

          Let me know guys,


          Warm Regards


          Ufopolitics
          Last edited by Ufopolitics; 05-21-2013, 12:36 AM.
          Principles for the Development of a Complete Mind: Study the science of art. Study the art of science. Develop your senses- especially learn how to see. Realize that everything connects to everything else.― Leonardo da Vinci

          Comment


          • Originally posted by Ufopolitics View Post
            I see above your RPM's are still too low.

            I posted this video a while back.

            IMPERIAL_RPMS_TEST_12V - YouTube

            With all Four Gates on... I reach over 1700 RPM's...with just one Gate (P1) it is reaching 1400...

            I believe your trouble is simple...and it should be a matter of timing set...
            Just curious...what is your resistance per Pair?...I believe is low, according to latest pic's I saw of your rotor...wire is pretty nice gauge, green-gold...I remember...and not as many turns...


            Let me know and we will go over this again, no problems Hitby, we will get it much faster!


            Regards


            Ufopolitics
            UFO once again you are correct, uncoupled the Imperial form the generator head, ran a comparison test to the above 12V test, can match your RPM, but it takes me two batteries 24V to do it. When I had trouble before you had cleared me of a diagnosis1 fault after viewing https://www.dropbox.com/s/ao5j9mvj8ovlpt1/SAM_0074.JPG you felt it was a diagnosis 3 fault (but I had already taken all the wire off and was doing the rewind) (my bad, must be cross-eyed, saw it was incorrect the first time, changed it, but must have overcorrected) – third times a charm Rereading all relevant posts.

            Originally posted by Ufopolitics View Post
            Stress Test on FET's:
            Test all Four Channels/Drains from each FET's with Four 12V Automotive Incandescent/Halogen Bulbs, (Feeding Source off12Volt Battery, of course...so bulbs won't blow out..) instead of Motor Gates, so, the Positive is common and goes to all bulbs...and one channel from Drain to each independent...and see if they stand the speed of pulses without locking any FET's...

            Let me know guys,


            Warm Regards


            Ufopolitics
            Good idea on the stress test, had done a short test on each FET individually but not all four in a motor simulation, this calls for a trip to the junkyard for more headlights.

            Thanks for the continued help & support.

            Namaste

            Hitby13kw

            Comment


            • Hello All
              Just thought you may be interested in what I am testing out yet.I finally gave up the milling as the X index needs some adjusting so it wont eat up boards. I etched this one and after a few points of re-soldering all is well.

              https://www.dropbox.com/s/ji60o4ipu3...ink1%20002.jpg

              Dana
              "Today's scientist have substituted mathematics for experiments and they wander off through equation after equation and eventually build a structure which has no relation to reality."
              Nikola Tesla

              Comment


              • Dana,

                Your board my not be as pretty as Hitby13kw's but if it works. It's just what the doctor ordered. Keep up the good work! We looking forward to your results.


                Keep it Clean and Green

                Richie

                Comment


                • Originally posted by prochiro View Post
                  I etched this one and after a few points of re-soldering all is well. https://www.dropbox.com/s/ji60o4ipu3...ink1%20002.jpg
                  Dana

                  Dana, Sorry about the mills X axis but your board looks great,

                  my words of wisdom: do the stress test first !!!!!
                  Our sprit will be in the lab with you, looking forward to your results.
                  Hitby13kw

                  Comment


                  • May the force be with you guys.

                    @ DANA, your tronics look good, probably a good idea to keep fets seperate, can't wait to see them working, thanks.

                    @ Hitby, am i reading you right?, Rewind your rotor again??? , OHH Man what a task.

                    All The Best Cornboy.

                    Comment


                    • Diagnosis 3 trouble

                      Originally posted by Ufopolitics View Post
                      Hello my Friend,

                      Sorry I did not respond before...but I was elaborating a Full Graphic response so you will resolve this issue ASAP...

                      Yes, indeed they are swapped/rotated from my original Diagram...so, the Troubleshooting goes to "Diagnosis 3"


                      [IMG][/IMG]

                      UFO,
                      Opened up my motor and shot a quick video, Dropbox OLD - youtube NEW

                      I think that it is lined up as indicated in your DIAGNOSE_3_SOLUTION picture above .. . .

                      What are your thoughts ? are the shorting straps incorrect (half a bubble off) or do you think it’s that I used 19awg instead of 18awg wire ?

                      Getting thing set up to stress my FETs . . . .

                      Thanks in advance for your help sorting out this affair. . . .

                      Namaste

                      Hitby13kw
                      Last edited by Hitby13kw; 12-20-2014, 03:16 AM. Reason: video url moved

                      Comment


                      • Hi Dana - Looks great but me being a worrier kind of person hopes that you are going to put heat sinks on those FETs just for precautions sake.

                        Comment


                        • Hitby, watched ur vid, some ideas

                          Can't remember the discussion on 18v19ga but it is a decided step down to use the same number of windings as recommended for 18. One thing I have picked up on Ufo's asymmetric motor designs is that we seem to need to fill the rotor completely with copper. Putting dalrods in for fences gives up precious rotor volume, and at ideal locations where magnetic forces are strongest. Like gravity they are inversely proportional to distance or squared maybe?, and reduce rapidly. And when you use a smaller gauge, you are simply designing a different machine, one that maybe can run on higher voltages and lower amps. So if you rewind recommend losing the dalrods.

                          I am in the throws of increasing my motor body housing inside diameter. My substitute housing was the exact diameter of my rotor plus magnet width. So I need a few hundredths inch clearance, the absolute smallest I can get given my handmade tolerances on parts. I figure thats just how you design electric motors in general. So if you push down the coil what, 3/8" from the magnets, its got to give up some significant field strength. Now you will have to see if I get clobbered by UFO on this, and take what I say with a grain of salt, since I am pretty new at motor making!!!
                          Last edited by sampojo; 05-22-2013, 12:03 AM.
                          Up, Up and Away

                          Comment


                          • MORE COPPER...Hitby...

                            Originally posted by Hitby13kw View Post
                            UFO,
                            Opened up my motor and shot a quick video,https://www.dropbox.com/s/2ufbgdh2zvc3j15/SAM_0155.AVI I think that it is lined up as indicated in your DIAGNOSE_3_SOLUTION picture above .. . .
                            What are your thoughts ? are the shorting straps incorrect (half a bubble off) or do you think it’s that I used 19awg instead of 18awg wire ?

                            Getting thing set up to stress my FETs . . . .

                            Thanks in advance for your help sorting out this affair. . . .

                            Namaste

                            Hitby13kw

                            Hello My Dear Friend Hitby13kw,

                            I do not believe your problem is a bad timing , or a teeth or two off at commutator location...now...looking at your machine...


                            Sampojo hit the Nail right on the Head...related to your main issue I see...

                            ...One thing I have picked up on Ufo's asymmetric motor designs is that we seem to need to fill the rotor completely with copper. Putting dalrods in for fences gives up precious rotor volume, and at ideal locations where magnetic forces are strongest. Like gravity they are inversely proportional to distance or squared maybe?, and reduce rapidly. And when you use a smaller gauge, you are simply designing a different machine, one that maybe can run on higher voltages and lower amps. So if you rewind recommend losing the dalrods....

                            Look at my Imperial Motor...right next to the Original Symmetric Winding from Factory...

                            [IMG][/IMG]


                            Someone call them "Space Balls"...


                            And the thing is...

                            Your Coils, by being further away from Stators....magnifies their Air Gaps...bad...weakens/slow down machine...
                            Second, I see lesser turns per coil...you say you did it as we all did...around 13-14 turns...but you used 19 instead of 18...so on the long run...when you pile many (56 total) coils...it DOES Reduces space...


                            Now, Machine Alive used 19 gauge also...but for some reason I see His Motor more "Copper Populated" than yours...

                            [IMG][/IMG]

                            I believe, as Sampojo wrote...you should NOT use those "rods" to seal/retain wires...they set them/compress them further back towards shaft...use regular hedges...

                            Everything resumes to the "Rotor Coils Magnetic Field Strength"...related to "Stators always steady magnetic fields, versus suddenly energized coils magnetic field projection" ...there must be a kind of balance there... between them...where the "building" of Magnetic Field MUST be as Fast and Strong as possible...it don't matter IF it is Bigger than Stator...but NEVER below Stators.

                            Whenever you decide to rewind your motor again...I will recommend to do the following test:

                            Wind first (with same 19 gauge) Pair One...BUT make around 20 turns per coil...THEN DO P15...Yes...P15 which is exactly opposed at 180º...THEN put motor together...and mark the specific comm element to be right at brush contacts for both pairs...then hit it with 12V...Straight-Linear...Parallel Input...and watch strength that Rotor spins...IF magnetic field is strong enough...it should keep going...making such big Throw Out Force...that it should close loops...then keep going.

                            One Turn or two...will NOT make a huge difference in the Magnetic Field change/improvement/strength...but Five and more turns definitively will.


                            After doing test successfully...take off P15, save wire and keep going with organized sequenced winding...


                            Warm Regards


                            Ufopolitics
                            Last edited by Ufopolitics; 05-22-2013, 01:38 AM.
                            Principles for the Development of a Complete Mind: Study the science of art. Study the art of science. Develop your senses- especially learn how to see. Realize that everything connects to everything else.― Leonardo da Vinci

                            Comment


                            • That Board LOOKS SOO BEAUTIFUL!!...

                              Originally posted by prochiro View Post
                              Hello All
                              Just thought you may be interested in what I am testing out yet.I finally gave up the milling as the X index needs some adjusting so it wont eat up boards. I etched this one and after a few points of re-soldering all is well.

                              https://www.dropbox.com/s/ji60o4ipu3...ink1%20002.jpg

                              Dana
                              Hello My Dear Friend Dana,


                              Man, those boards look SO GOOD!!!...But please... ...Just HIT/FIRE The Darn Thing!!!....

                              They even look BETTER than Hitby's...( doN'T Let Hitby hear/read about this, please!!)

                              But I swear....I LOVE that Transparency look on them...seems like Windows 7 Transparencies...


                              Follow the advice from Zardox...Put some - even small- Heat Sinks on FET's...just a flat piece of Aluminum with a hole and thread for bolts...just for the sake of "Safety"...OH!...and since you are doing this...Use ONE Heat-Sink Plate for the Two FET's Together at each channel..since Drain is common to both...


                              That Board...AS IS...will become "Part of this Story teller...about Witches and Princesses"...


                              Warm Regards


                              Ufopolitics
                              Principles for the Development of a Complete Mind: Study the science of art. Study the art of science. Develop your senses- especially learn how to see. Realize that everything connects to everything else.― Leonardo da Vinci

                              Comment


                              • Hello All
                                @Hitby
                                You don't need anyone else rubbing it in but just know that what the others have said is also my opinion. At least we know now that you will have a top notch machine for sure and not be guessing about it. I wish we would have seen the rotor earlier...

                                @ UFO
                                Testing is going well and fast now. Yes there will be four heat sinks and a fan. Thanks Zardox... Its been running for four hours with a small load and no heat. Will increase the load after work tomorrow and if all is still well will probably get Imperial attached Thursday.
                                Dana
                                "Today's scientist have substituted mathematics for experiments and they wander off through equation after equation and eventually build a structure which has no relation to reality."
                                Nikola Tesla

                                Comment

                                Working...
                                X