This forum is preserved as a permanent archive. The community continues at eMedia Press.

Announcement

Collapse
No announcement yet.

My Motors got me to Tap into Radiant Energy

Collapse
X
 
  • Filter
  • Time
  • Show
Clear All
new posts

  • machinealive
    replied
    Hello everyone

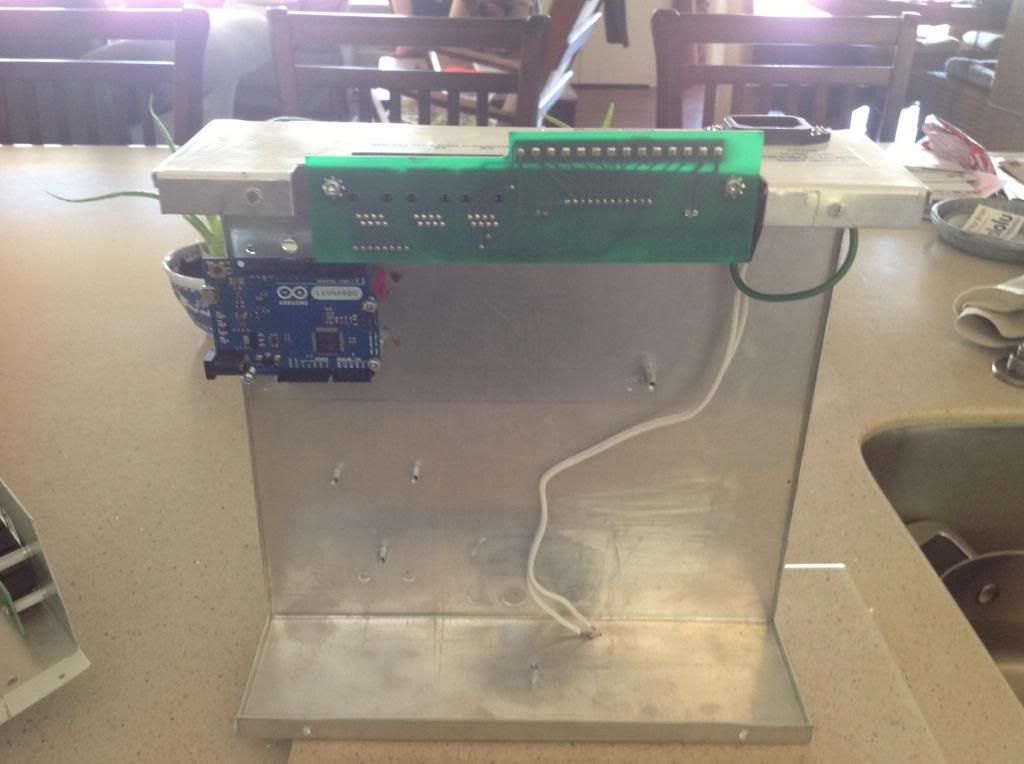
    First weekend off for a while. I've managed to get enough sensors working to try out motor. Everything appears ok on breadboard. I didn't hook up to ads1115 yet. I2C is still one extra chapter, and I need to try what I've done so far, just..can't... wait... . At this time I can measure volts in, current in, which will read out watts/hr as well. Temp of 1 brush, and rpm. It all analog, but it will be a start if it works as I hope.

    Today I'm starting to put my metal box together and hopefully give it a run tonight, constant DC, first, see if current was accurate before. I have another leonardo coming to run motor. Hopefully mon or tues.

    The boxes should fit the 4 drivers nice in another separate box.


    Good luck
    Everyone
    Machine

    Leave a comment:


  • prochiro
    replied
    @JS

    Thank You sooooooo much. This is clear so far and does for me at least give enough confidence to get going on that much. I have experimented with other parts but in the end, they are not what we shall all use to be consistent and accurate.
    Dana

    Leave a comment:


  • JohnStone
    replied
    Originally posted by prochiro View Post
    @ JohnStone
    The sensors and breakout boards shown and some still being discussed has been exciting but at the same time confusing. Could you give just a simple list of what and where found, the items that have been decided on solid. Ordering parts that may not be used is not fun and having no parts ordered for fear they will change is not fun also. Just a simple list.
    Dana
    Hi Dana,
    you are right - confusing! Any new initiative needs to be negotiated when and at what maturity to be made public.
    • Too early - early feedback and possible confusion.
    • Too late - feedback too late and possible late essentail modifications.

    It is a balancing act.
    I am so sorry to have caused confusion. But I am sure I marked it as concept for dicussion. Anyway I apologize and in future I will mark preliminary discussions more prominently.
    I got few feedback but one essential: TMP201 sensor is 3.3V only. I missed that very obvious item and shifted to TC74 from microchip.

    In order to omit confusions I urge all of you to separate motor control and data aquisition to be two separated systems. I.e. timer use and processing power might be a drawback we do not want to encounter. Later on we might be able to combine them.

    I issue here my list of purchase for key parts:
    -----------------------------------------------------------
    Arduino Leonardo:

    Essential properties: 2 serial I/F, 5V design, possible use of USB PC keyboard, USB Mouse by adding code
    Use: Control of data acquisition and I/F to PC
    Source:
    Please look for possible cheaper sources.

    -----------------------------------------------------------
    Four channel ADC breakout board: ADS1115

    Essential properties: 5V design, 16bit resolution, 4 channel adc, built in controllable preamplifier up to 16x amplification for easy range adaption
    Use: Measurement for input voltage and input current
    Source:

    -----------------------------------------------------------
    Please reagard that it is not easy to find a temp sensor being available all over the world, 5V design and easy to process. Additionally regard that those sources mentioned below might sell in your country under another name. eBay is another possible source but EXTREMELY expensive offers just now.
    You need an insulations kit in order to get clear GND separation in your setup (ESSENTIAL)


    Temperature sensor #1: TC74A0-5.0VAT

    Essential properties: 5V design, easy mounting by screw (please provide isolation), predefined I2C address: 0
    Use: Motor coil surveillance
    Source:
    • RS / Alliedelec ($1.56) link
    • Farnell / Newark ($1.37) link


    Temperature sensor #2: TC74A3-5.0VAT

    Essential properties: see above
    Use: see above
    Source:
    • RS / Alliedelec ($1.37) link
    • Farnell / Newark ($2.95) link

    If you intend to use more temp sensors of this type please buy an individual type for each sensor:
    TC74A4-5.0VAT
    TC74A5-5.0VAT
    .....


    Insulation kit for each temperature sensor:

    Essential properties:
    Use: Isolation of GND from setup (ESSENTIAL). You might find other sources or solutions
    Source:
    • Farnell / Newark ($1.37) link
    • or others like eBay or local electronic shop


    -----------------------------------------------------------
    Please reagard that not all curents sensors from allegro have a high voltage isolation (some 100V only!!!). I suggest a high voltage type +-75A. You might find another choice to be suitable for your setup. In this case you need to adapt the conversion factor to true amps only (Program code).[/SIZE]

    Current sensor: ACS709

    Essential properties: High voltage isolation, bidirectional in case of current feedback
    Use: Measure input current, high side, to be used along ADS1115 breakout board
    Source:

    -----------------------------------------------------------
    Bluetooth Tranceiver:

    Essential properties: 5V operation, populated PCB (do not cinfuse with adapter boards), Link to PC by COM port tunneled via BT
    Use: Isolation of setup from PC, remote control of setup
    Source:

    Note: still pondering on RPM sensor. It needs to be reliable, easy to use, fast and cheap......

    ~o0o~

    The list above is my preferred purchase list. I am very confident that it will work like expected. The final proof is if the first 3 setups are doing well. If you want to have final proof please be reluctant in purchasing those componentents and wait for final proof.
    JS
    Last edited by JohnStone; 08-25-2013, 05:28 PM.

    Leave a comment:


  • Midaztouch
    replied
    Team.....Build, Test and Sell quickly

    Originally posted by iankoglin View Post
    G'day Richie
    I purchased 2 of these some time ago

    5K Ohm Electric Scooter, Bicycle, and Go Kart Throttles - ElectricScooterParts.com

    I have not installed a Kill Button Just an ON/Off Switch and an inline fuse probably use a 10 amp

    I am looking forward to Your Build It takes time to do things properly I am always tooo anxious to finish things

    Kindest Regards


    Kogs still trying
    Kogs

    Yes, those are the throttles that most DIY builders are using. Magura throttles is the standard. The big boys have custom ones. How is the response to your motor with the Magura throttle? Quick reving and quick release? Vids please

    UFO strongly recommends an Emergency Stop button on the handle bars. If the fets legs go, the motor could be on full blast! He had to Wrestle his spinning scooter on the ground and rip out the wires because it wouldn't stop. We don't want you or anyone else around getting hurt

    Please use NEVER WET to weather proof your Boards. That way, Radiant can stretch her legs in the sun, take a shower in the rain, play in the shadows of darkness and light up the nights.

    We are in the era of rapid prototyping. Build quickly and safety first. Every motor system you have, ride it then sell it quickly. If there is a problem, labor/repair for free, charge for cost of parts and MOST IMPORTLY collect data from the owner! With the money from the first build, build another one. And so on!!!!!

    Team, I encourage all of you to do the same! Build, sell and rebuild quickly.
    Who will be the first? Who will have the most units out to the public in a year?
    It could be you! Enjoy!!!

    Keep it Clean and Green
    Midaz
    Last edited by Midaztouch; 08-25-2013, 06:36 AM.

    Leave a comment:


  • iankoglin
    replied
    Originally posted by Midaztouch View Post
    @ kogs

    Hey kogs,

    I have to order a twist throttle from the states. Are you using the Megura twist throttle for your bike? Also, do you have an emergency HV kill button? If so, what is the rating?

    Keep it Clean and Green
    Richie
    G'day Richie
    I purchased 2 of these some time ago

    5K Ohm Electric Scooter, Bicycle, and Go Kart Throttles - ElectricScooterParts.com

    I have not installed a Kill Button Just an ON/Off Switch and an inline fuse probably use a 10 amp

    I am looking forward to Your Build It takes time to do things properly I am always tooo anxious to finish things

    Kindest Regards


    Kogs still trying

    Leave a comment:


  • prochiro
    replied
    @ JohnStone
    The sensors ans breakout boards shown and some still being discussed has been exciting but at the same time confusing. Could you give just a simple list of what and where found, the items that have been decided on solid. Ordering parts that may not be used is not fun and having no parts ordered for fear they will change is not fun also. Just a simple list.
    Dana

    Leave a comment:


  • JohnStone
    replied
    @ALL:
    The tutorial for building monster driver shall be much more than help for Cornboy.
    He is the preferred object because he is a bloody redneck in electronic matters and is willing to learn in small steps. Initially he trusted not in himself that he could build electronics. I promized him long ago that he will be able to do it and we will get him there to.
    Performing help publicly all of you may draw your advantage. This is strongly intended!

    But that is not all.
    Please get educated thinking in building stones and comprehend how they interact. Based on this knowledge the whole realm can be understood better. Of course this is a big deal for all of you being impatient - I know it but there is no alternative. You will experience at every shortcut to come back and go the long way.
    Building UFO motors is very alike!
    - UFO started the first thread for educating first building stone.
    - Then he started the second one building motors.
    - Now we added FET drivers, Arduino control and prepare for data acquisition.

    Did any of you get a successful shortcut? Yes, some very promizing runs but we need to get the whole cup.
    - Now we need to get all building stones work together. With such a setup we can start research, find sweetspots, valuate changes, perform developments. A usable PC dashboard will be the last step of a long and stony way of preparation. It will give you clear insight into your setup......

    I want all of you to get professionals and rise over simple tinkering! If you performed all those steps you are an experienced researcher and have the mindset, tools and potential for doing much more.......
    And all of you having not the funds for performing like others - your time will come. We are a community and our success will be your success as well. Your time will be if we have totorials for a free energy device.
    John Stone
    Last edited by JohnStone; 08-24-2013, 07:59 PM.

    Leave a comment:


  • JohnStone
    replied
    Garry,
    the battery problem you mention can be explained with simple words. Any battery can supply much current while refusing charging with same current. But exact this condition is requested if we try to charge a battery while discharging it. In most setups the current consumption happens not in same time like feedback.

    One solution could be to feed plus lead through a big choke and add a cap bank after choke. But I am not sure how radiant behaves at inductivities and if radiant likes to cooperate with hot current at all.

    Alternatively you draw less current than accepted charging current. But then you need excessive big battery banks for UFO motors.
    Those notions above refer to normal hot electric effects. I do not know how radiant behaves. We need to research it.

    Of course it is possible to switch batteries over. I would recommned relays for switching because I do not trust radiant to accept switching FETs. It might do very strange things along electronics.
    In order to save energy we could use bistable pulse relays. They toggle state at every pulse and were used in former times for switching light from different control switches.
    But please be aware that we still have the charge / discharge problem mentioned above.

    Radiant and batteries:
    Remember Bedini performd a charge/discharge test by having one primary battery and 3 empty secondary ones. He charged / discharged the secondaryies 3 times with his setup (radiant) before primary was empty.

    Apart that it is told that a battery being conditioned by radiant is different in nature after conditioning. Conditioning takes several radiant charging cycles. Those batteries are told to charge up to 30V without any gas building or damage.
    If a such conditioned battery is being charged by hot current it is told to start to discharge first by accepting charge current!!!!!(it seems to eliminate radiant charge before) and then takes over to hot charge.

    I try to explain that the first step should be to charge batteries with radiant and check their behaviour. Depending on observations we can design our battery switch-over function.
    Once again a proper Arduino battery data aquisition and management system might shine bright light of knowledge into the dark of radiant realm (dark only for us mere mortals of course). Before we need to have some UFO motors running under Arduino observation. BTW: I will run my motor after completion at a test bench along true mechanical power measurement (controlled eddy current brake (out of an execise bike) and dynamic torque sensor (from THUN electric bike)

    But back to your question: Battery switching might be one of the simplest items of all.

    JS

    Originally posted by GChilders View Post
    @JS

    John I know you are busy and I do not wish to take you from other tasks with this question. Kogs has mentioned that trying to charge the battery at the same time that it is being used will trash the battery. Is it possible to have a circuit that switches over after the battery runs down to receive a charge, while simultaneously letting another battery take over the input side of the equation. Dual battery banks with both being able to supply the necessary feed to the motor and both being able to receive the charge from the generator but at different time frames. I.E. one bank feeding and one bank charging at the same time. Sorry for the interruption.

    Cheers

    Garry

    Leave a comment:


  • JohnStone
    replied
    Originally posted by Hitby13kw View Post
    That was the easy part, all Arduino's have a built in 3.3V regulator ~ it can't supply much current, but it does support 2 TMP102's
    ...
    Yes well! But I2C signals go up to 5V and that is not accepted by TMP102 (see datasheet).
    We can set SCL down to 3.3V by resistor voltage devider but we get implications at SDA being bidirectional.
    Apart that TMP102 will draw current on bus signal via internal protecting diodes -> it wil supply itself by bus signals above 3.3V and feed current back to 3.3V
    That's why I shifted to TC74 from Microchip.
    My comprehension!
    But you might have found a viable way to do it though.

    BTW: Check this link.
    JS
    Last edited by JohnStone; 08-24-2013, 08:24 PM.

    Leave a comment:


  • GChilders
    replied
    AB switch for Battery Management System

    @JS

    John I know you are busy and I do not wish to take you from other tasks with this question. Kogs has mentioned that trying to charge the battery at the same time that it is being used will trash the battery. Is it possible to have a circuit that switches over after the battery runs down to receive a charge, while simultaneously letting another battery take over the input side of the equation. Dual battery banks with both being able to supply the necessary feed to the motor and both being able to receive the charge from the generator but at different time frames. I.E. one bank feeding and one bank charging at the same time. Sorry for the interruption.

    Cheers

    Garry

    Leave a comment:


  • GChilders
    replied
    Monster Board Instructables

    @JS

    John what a great tutorial you are producing here for those of us who have limited electronic experience. I was daunted when I first looked at that circuit diagram, but feel it is possible to achieve success with you breaking it down into doable sections. Thanks for taking the time out of your busy schedule to do these for us that are following along.

    Cheers

    Garry

    Leave a comment:


  • Hitby13kw
    replied
    Originally posted by JohnStone View Post
    Hi Hitby,
    wow! You are much faster than I expected. Even faster than the brand new garlic service

    1.-------------------
    How did you account for TMP102 being a 3.3V type?
    That was the easy part, all Arduino's have a built in 3.3V regulator ~ it can't supply much current, but it does support 2 TMP102's

    Originally posted by JohnStone View Post
    2.------------------
    RPM: Arduino offers plenty ways to measure rpm SW or HW. As we want to have a fast system we should focus to HW frequency measurement.
    A. Either counting a counter directly and look at it after i.e. 1ms and reset it. The counts represent frequency.
    B. Else let counter run by internal clock and let rpm sensor perform an interrupt. The contence of the counter represents pulse time and can be transferred into rpm.

    In both cases we need to decide at what lowest rpm we want to have valuable values. Upper frequency is no problem. Here are some links 1 2


    And we can understand now that we an not load a single Arduino with all tasks. I.e. at using timers we get conditions impeding each other. It will be no major problem if motor control / pulser gets another rpm signal. For first tiem research state it is the by far fasterst approach.
    Of course for further elicitations we can refine. But it would be helpful if we have a separated data acquisition system we can add deliberately at any running setup if we want to look deep into it. Please all think in terms of building stones and not in terms of monolitoc finla all in one solutions. Those refer to cost reduction for series production - and there it pays of course!
    Let me ponder on your links - looks like we need to load in a new Library for either one ~ much testing and comparison to be done.

    hitby13kw

    Leave a comment:


  • JohnStone
    replied
    Hi Hitby,
    wow! You are much faster than I expected. Even faster than the brand new garlic service

    1.-------------------
    How did you account for TMP102 being a 3.3V type?

    2.------------------
    RPM: Arduino offers plenty ways to measure rpm SW or HW. As we want to have a fast system we should focus to HW frequency measurement.
    A. Either counting a counter directly and look at it after i.e. 1ms and reset it. The counts represent frequency.
    B. Else let counter run by internal clock and let rpm sensor perform an interrupt. The contence of the counter represents pulse time and can be transferred into rpm.

    In both cases we need to decide at what lowest rpm we want to have valuable values. Upper frequency is no problem. Here are some links 1 2

    Leave a comment:


  • Cornboy 555
    replied
    Jump Again.

    Hello John Stone and all, Finished Instructable Section 3 Opto input.

    Works beautiful, but one catch, you must use the jumpers shown on the board, you can connect them underneath if you wish.

    Let's go with next step, when you'r ready John.

    Thanks Heaps, Cornboy.

    Leave a comment:


  • Cornboy 555
    replied
    Originally posted by iankoglin View Post
    G"Day Team
    Thursday I finished building another 2 John Stone's Monsters (untested) also modified my Oscillator to accept the 5k ohms twist throttle. Yesterday I received 3 - 7.1ah SLAB's. Today I finished rehashing my box to fit all the components in and enough room to fit 3 more batteries if I want to. I connected all the components ( including another Motor not connected to my Bike) and connected the batteries every thing went sweet. Tomorrow or Monday I will finish connecting everything permanently and take some pics.

    Kindest regards to you all


    Kogs still progressing

    Great Kogs, look forward to it.

    Regards Cornboy.

    Leave a comment:

Working...
X