Announcement

Collapse
No announcement yet.

My Asymmetric Electrodynamic Machines

Collapse
X
 
  • Filter
  • Time
  • Show
Clear All
new posts

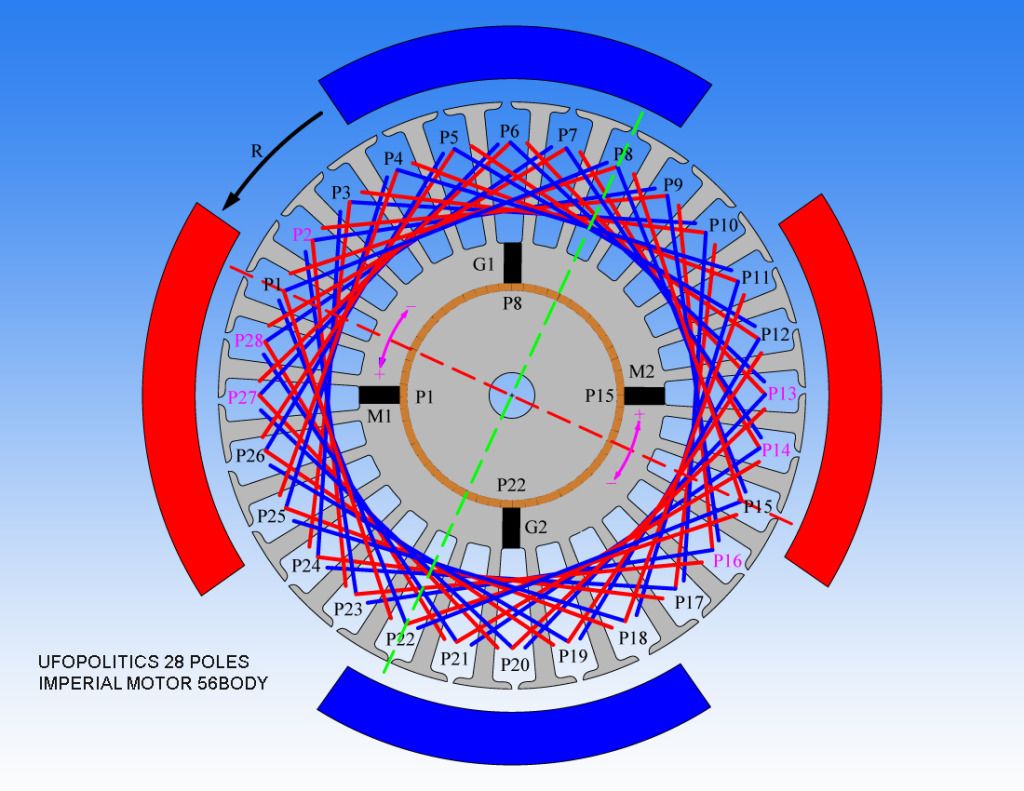
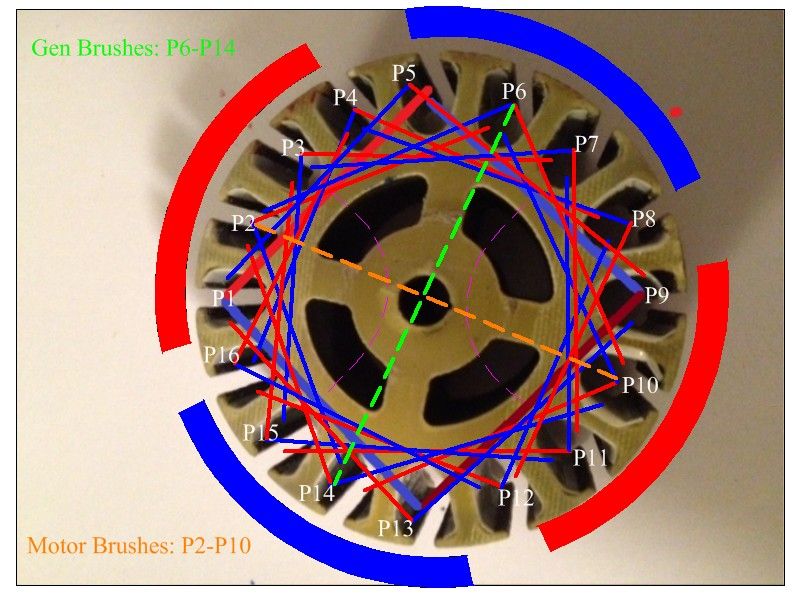
  • About the Multi-Filar Coils...

    Hello to All,

    I would like to point out a couple of things related to the Multi-Filar wound coils concerning our Motors...

    Guys, it is not necessary to go that "accurate" on the litzing/twisting etc...please, I would like you to concentrate first than all, in the Magnetic Fields...rather than in the looks...or the Math to it.

    What we are looking for is a simple twist on the wires...just in order that they will not spread out during winding...that's all.

    Not too twisted, since this would bring other unwanted electric field effects, like Sir John Stone posted above.

    The "Ideal" Multi-filar for this would be perfectly Parallel strands of wires...and, since this is not possible (unless we glue them together... ) because they will tend to spread apart at curves when winding and applying pressure...then we just need a simple twist to achieve this.

    And the Math was already posted by Kogs...so that simple.

    And yes Sampojo...all strands would be attached/jointed at start and end...cleaning all insulation enamel...and soldering/clipping them together...

    The point here is to Increase the Magnetic Field Strength by multiple strands projecting in parallel the same magnetic pole Vectors...while current is forced to split into several wires, weakening its "per strand" value during the coil spiral traveling...no matter if at the end...they will join back again.

    In other words...We are energizing several Individual Parallel Coils, following same direction of winding...and each Coil would be projecting its Individual Magnetic Field that will Sum Up in the 3D Space.

    Over the years...Our main mistake has been to minimize/disregard or even forget about looking at Electrodynamics from the Magnetic Field perspective and projections in 3D Space...while concentrating in other parameters, like Math...Physical Shape of Coils, Wires etc...and that, is a big time mistake my Dear Friends.


    Warm Regards


    Ufopolitics
    Last edited by Ufopolitics; 10-07-2013, 06:34 PM.
    Principles for the Development of a Complete Mind: Study the science of art. Study the art of science. Develop your senses- especially learn how to see. Realize that everything connects to everything else.― Leonardo da Vinci

    Comment


    • Thank you sampojo,

      Ah, good. So it is best to get as much copper mass per pole as practical, more so than matching the 'stock' motor electrical characteristics. I think I can use a trifilar #32 and get over 2 ohms with the goldmine armature. It has a lot of free space too, I can look between two of the poles and see all the way to the bottom iron. I picked up 6 motors so I can play around with two ufo style and still have a couple to ruin.

      @Ufopolitics. My main concern with the ohms was the amount of heat that would be generated by the resistance. But now that I think about that, once I start pulsing the motor that will reduce it quite a bit, plus we have the built-in cooler running characteristics of your asymmetric design.

      I used to race slot cars back in the mid 60's and we re-wound a lot of 3 pole armatures. These goldmine armatures are gigantic compared to those, and we were winding 'double 30' and 'double 32' on some of them. Not twisted though, and the term bifilar was unknown to us. One thing I remember is the 'doubles' ran quite a bit cooler than the single strand heavier gauge winds, but they didn't have quite as much power (torque).

      Man.. if we had UFO motors back then we would have won every race in sight

      This is going to be fun.

      Regards,
      Cadman

      Comment


      • 12volts @ 30amps

        Team UP

        Worked at a professional electric motor shop today. Only one tiny DC motor in the whole shop! Only the oldest shop staff and owner, both 60+, have repaired or used DC motors!


        Today's test results: 12volt @ 30amps = 1000rpms. (We used a DC machine for power, NOT batteries.) I checked the positions of the brushed using a continuity meter. The brush alignments seemed ok. Thoughts!?

        They checked my windings.....I made a good effort but many mistakes. Please use water-proof electrical paper. The boss said take everything off and wind it again with advice from his supervisor.(the supervisor was NOT happy about that!!!) Anyway, I will try my best to finish the motor by next week.

        We used fiberglass strips to keep the wires in. Pic below

        Midaz

        Ps. Balancing a motor at a professional shop is $500-$800 in Japan! Ouch! Is that price normal in The States?
        Last edited by Midaztouch; 10-09-2013, 11:06 PM.

        Comment


        • Hello everyone

          I managed to get the shaft completed, all parts fit nice. So I'm up to the drum and brackets. I made a video for you guys, to see where I'm at.

          Shaft finished - YouTube

          It was a lot more time involved then anticipated, lots of adjustments and little parts. UFO, the shaft is 1 1/2". Millimeters from now on.

          So I need a little time to think about this drum, and also to get about 20 little jobs done around the house. If you need any other measurements UFO, just let me know.

          Comment


          • 12 V Test

            Originally posted by Midaztouch View Post
            Team UP

            Worked at a professional electric motor shop today. Only one tiny DC motor in the whole shop! Only the oldest shop staff and owner, both 60+, have repaired or used DC motors!


            Today's test results: 12volt @ 30amps = 1000rpms. (We used a DC machine for power, NOT batteries.) I checked the positions of the brushed using a continuity meter. The brush alignments seemed ok. Thoughts!?

            They checked my windings.....I made a good effort but many mistakes. Please use water-proof electrical paper. The boss said take everything off and wind it again with advice from his supervisor.(the supervisor was NOT happy about that!!!) Anyway, I will try my best to finish the motor by next week.

            We used fiberglass strips to keep the wires in. Pic below

            Midaz

            Ps. Balancing a motor at a professional shop is $500-$800 in Japan! Ouch! Is that price normal in The States?

            Hello Midaz,


            Nice man, am sorry about having to rewind it again...please use gloves...

            About the 12 V Test...I believe what your Motor needs is Timing being set better.

            Look at My 12V test:

            IMPERIAL_RPMS_TEST_12V - YouTube

            I am not reaching over the 25 amps (@20-21 amps)...and P1 (Just One Gate) does over 1000 RPM's (1300)

            When you rewind it, pull wires tighter, and see if you could do 14 Turns.

            And the other thing...I see those hedges way too thick!!...the "U" Channel type Hedges I have used...are made of fiberglass very hard paper...they do the job...as when you epoxy the whole armature they harden even more.

            I would not have been able to press those thicker fiberglass strips like yours on my Imperial.

            One last thing...after tests are passed and everything is fine...BEFORE sending it to be epoxied...I recommend you do something I did not do... They have a special fiberglass strip you could find at Motor Shops or Supplies...That strip is used on the commutator lower or "neck" of armature between commutators and coils, must be tightened then epoxied along with the rest. This strip keeps wires going to comm tight and isolated from any external debris...or from getting loose at high speeds.


            Good luck and happy winding...any questions let me know.


            Regards


            Ufopolitics
            Principles for the Development of a Complete Mind: Study the science of art. Study the art of science. Develop your senses- especially learn how to see. Realize that everything connects to everything else.― Leonardo da Vinci

            Comment


            • Coming out great!

              Originally posted by machinealive View Post
              Hello everyone

              I managed to get the shaft completed, all parts fit nice. So I'm up to the drum and brackets. I made a video for you guys, to see where I'm at.

              Shaft finished - YouTube

              It was a lot more time involved then anticipated, lots of adjustments and little parts. UFO, the shaft is 1 1/2". Millimeters from now on.

              So I need a little time to think about this drum, and also to get about 20 little jobs done around the house. If you need any other measurements UFO, just let me know.

              Hey Machine,

              Lots of work my friend!...wow!...That Machine looks impressive.

              I can bet your desire to end/stop the Oil stinking Machines is as big as mine......That get Us going right?...

              Now...going over your video...and the amount of brushes I am counting on the future Drum...I see more than two...do you have two set Radially on top (closer to Imperial side)...and one at bottom also radial...plus one axial at end cap (the one you had to redo with hole on Crushing Blue Cap...?

              Just need to know in order to set your drawings right...I swear I will not tell anyone...


              Regards


              Ufopolitics
              Principles for the Development of a Complete Mind: Study the science of art. Study the art of science. Develop your senses- especially learn how to see. Realize that everything connects to everything else.― Leonardo da Vinci

              Comment


              • Originally posted by Midaztouch View Post
                Dana!

                Of course I've already done it! At the time of the post I was so nervous and excited that I didn't want to want to take a chance! I needed a while to calm down! Once we find a balancing shop and varnish/resin, we will spin her up with stronger batteries!

                Keep it Clean and Green
                Midaz
                G'day Midaz
                If I remember correctly and upon further peering into the winding of the motors You cannot just swap the wires
                If you have wound the N and S poles correctly the motor will run efficiently running CCW , it will however I am sure run in the CW way if run without a load.
                If you wound the NP CW and the SP CCW then it should run correctly with the Negative wires connected to the Drive end Comm

                Since you wrote this post I have pondered on it and I am sure this is right It is better for you to make sure that the motor is wound correctly NOW before you continue with your build and testing

                Kindest Regards

                Is Kogs thinking aloud allowed

                Comment


                • Midaz, Kogs is right, have you studied this

                  Hi Midas, I would think Kogs, is absolutely right about a simple reversal here. I assumed immediately that meant neutral timing, but I took a quick scan here at Ufo's P65 post and I think I saw timing consideration. So you lose much on a simple reversal without retiming it, methinks. Did you try something besides neutral timing? As far as winding mistakes, are you sure these guys can say that, as they have never seen a dual commutator motor in their lives before? But you have given up a wind or two per pole on the coils with those fat fences. So even if you wound right you are in for a rewind. What is your resistance per coil, does it meet recommendations. Sorry don't have those handy.

                  Originally posted by Ufopolitics Pg65 post 1930 View Post
                  Hello to All,


                  Ok, here is the P-28 Diagram to wind that Nice Machine...
                  It is based on the same original P-12 Diagram...As also like the Razor P-16...

                  Here I am embracing Seven (7) Poles per Coil, so a Pair will comprehend 14 Poles (Half The Circumference), This creates a Huge Throw Out Angle of Impulse based on Repulsion-Attraction at Four Points of Quadrant...Delivering a great Torque and Speed.

                  P-1 and P-15 are ON at Motor Brushes(red intermittent line), while P-8 and P-22 are ON at Generating Side(Green intermittent line)...in this "Paused, captured frame momentum"

                  Imagine if Turion (Dave) said the Torque on the 16 Poles was so strong He had to tighten all batteries and equipment on his bench...What this "creature" will do?!...

                  Yes Dave, please...hold on tight to your underwear...when testing Torque on this one...


                  [IMG][/IMG]


                  Now, please note that I have set the Timing Arrows at Motor Brushes, (in Magenta color) I have set a "+" and a "-" meaning to set timing backwards(-) or forward (+)...by setting forward, Machine will increase Torque and Speed...yes, both...However, I have also set the Pairs in Magenta indicating those are the Max-Min range you could move up to...so, reverse only could go one pair back...doing it more will be conflicting Bisectors from Stators and Armature to be "Too close" so Motor may hesitate at start...to change direction of Rotation.
                  Best is to get it "Forward" reach over the 3600 RPM's...close to 4000...then doing the final speed adjustment with speed controller and with Loads On at Generator.

                  Regards to All


                  Ufopolitics
                  What Kogs is talking about has been discussed heavily on the thread, about keeping the winding direction the same for the total coil. When you flip perspective on the total coil, you flip winding directions, as it is relative to the perspective, i.e. whether you are looking at a N or an S half. If you are unsure about this, let us know and we can elaborate. Since asym motors are totally symmetrical mechanically, (e.g. comm on each end) you have to label one end front and back and pin that diagram to the motor end you label as front and it should rotate in the direction of the diagram.
                  Last edited by sampojo; 10-09-2013, 04:15 AM.
                  Up, Up and Away

                  Comment


                  • @All


                    I followed UFO's winding vid and my motor ran clock wise.

                    Also the electric repair shop measured my wires this morning. The wire was 19.5 AGW. I need 18awg! The shop has the correct wire.

                    Sorry I had many mistakes! Will do better this time!

                    Midaz

                    Comment


                    • Originally posted by Ufopolitics View Post
                      Hello Dave,

                      That is a great book, I have it, thanks for bringing it here...however, it will give you a deeper insight into the Symmetric Systems...not the Asymmetry...by 1920's it was already out.

                      I see what you mean by having a North and a South across...You are not seen the Magnetic Pair-Coils "Virtual" Axis...remember they are not across in pairs, but right next to each others...so their "U" Shaped now axis, never meets the one across...they make a "U" Turn right in front of Motor Shaft. Their Magnetic Pattern is a perfect "U", therefore, they never cross vectors of magnetism.

                      All You got to do here is wrap one after the other, just leaving one pole between them...


                      [IMG][/IMG]

                      I have used your original Two Pairs as P1-P9, then I wound them all around following that start...However P2-P10 will be your Brush for Motor
                      As P6-P14 your Generator Brushes, all at 90 between them and related to Stators...more or less...
                      Motor will rotate clockwise.


                      Hope you see it now...


                      Regards


                      Ufopolitics
                      G'day UFO
                      I know you are really busy . But I have searched and searched but I can not find any where showing how P1 is connected to the comm. I have examined the above but Perhaps I am just too dense I can not understand just where the Start and finish of P1 connects to the comm.
                      Please my friend can you enlighten me.

                      I now have 2 "MY1060" motors mechanically modified both are 4 permanent stators one has 16 poles and the other has 20 poles
                      The 20 pole I will wire like the Bosch motor.
                      When I finish these I will wire my MY1000w motor like the Bosch also

                      Kindest Regards

                      Kogs going around in circles

                      Comment


                      • Hello all, i am jelous of all you guys, at the moment, i can't seem to find a spare nanosecond to work on my motor. I was harvesting my extremly late Corn crop, and clobbered the feed out auger on a tree, and bent the auger mounting.

                        Ended up having to unload 6 tons of grain with a bucket, .

                        @ Machine, good work on the Gen, Scratch building can be very time consuming, that's for sure, but also very rewarding.

                        Thanks for the vid, i assume you are thinking of the plastic container, for the drum to hold the rotor wire?

                        From what i have gleened from the Dynamic Figuera patent, and UFO's, ideas on it, we need to make the induced wiring - drum, as thin as possible. In other words, the inducing, or exciting, static stators need to have as small a gap as possible, between them.

                        @ Midas, i am holding my breath to see what you guy's come up with.

                        All the Best, Cornboy.

                        Comment


                        • IMPERIAL running CW

                          Originally posted by Midaztouch View Post
                          @All


                          I followed UFO's winding vid and my motor ran clock wise.

                          Also the electric repair shop measured my wires this morning. The wire was 19.5 AGW. I need 18awg! The shop has the correct wire.

                          Sorry I had many mistakes! Will do better this time!

                          Midaz
                          Hello Midaz,

                          The reason why your motor is running CW when properly energized according to your correct winding as per my videos...is due to Factory Swap of Magnets Stators...I already went through this issue with Hitby13KW...where we trouble shoot his set up and why it was running with lower RPM's...

                          [IMG][/IMG]

                          When we receive our Imperial (and did not check their Stators Polarity set)... they could have come with rotated stator magnets by 90º from factory on the main frame...related to the way I have displayed here... on how mines came "originally" from factory...

                          FACTORY SET UP AS I HAVE EXPLAINED IN ALL VIDEOS:

                          [IMG][/IMG]

                          So you reverse polarity...and motor runs as you wanted...or CCW...BUT...your motor is running mainly on "Attraction Mode"...that is why you can not obtain higher RPM's than mine (and Lower Torque)...because in mine, all Motor Gates are triggering/firing on Repulsion Mode...

                          In Symmetry...this difference in positioning of stators would not matter...since no matter what...the rotor would be creating a Single and constant reversed field always perpendicular to the way stators are.

                          Hope you understand the situation...it is very well described in Trouble Shooting Guides...in a while back posts here.


                          Regards


                          Ufopolitics
                          Last edited by Ufopolitics; 10-09-2013, 05:33 AM.
                          Principles for the Development of a Complete Mind: Study the science of art. Study the art of science. Develop your senses- especially learn how to see. Realize that everything connects to everything else.― Leonardo da Vinci

                          Comment


                          • Hello Kogs!

                            Originally posted by iankoglin View Post
                            G'day UFO
                            I know you are really busy . But I have searched and searched but I can not find any where showing how P1 is connected to the comm. I have examined the above but Perhaps I am just too dense I can not understand just where the Start and finish of P1 connects to the comm.
                            Please my friend can you enlighten me.

                            I now have 2 "MY1060" motors mechanically modified both are 4 permanent stators one has 16 poles and the other has 20 poles
                            The 20 pole I will wire like the Bosch motor.
                            When I finish these I will wire my MY1000w motor like the Bosch also

                            Kindest Regards

                            Kogs going around in circles
                            Hello Kogs,


                            On this Diagram that you have shown, I have chosen P2 and P10 as the Motoring Energized Pairs (not like I normally do, starting by P1...plus Pn set around 180º) sorry about this.

                            The Orange intermittent line represent the Related Pairs (P1/P10) Contacting Commutator Elements with Brushes, which are set exactly at Stators Dead Center or Stators Bisectors.

                            The Green Line represents the Generating Elements making contact with Brushes.

                            Does Your Motor have Brushes set at Stators Bisectors?....They should be like that.

                            The Main point you should have in mind...is that each Coil must grab Four (4)Poles, so the Pair will grab a total of Eight(8) Poles...and the Pair Opposed by 180º will close the 360º Quadrant (16 poles) by adding the other Eight (8) Poles.

                            This number of Total Poles Machines like 16, 20, 28...are simple...as they are divisible by Four.

                            The complication arises when we have 21...or 33 Poles...but I have that issue taking care off...


                            Warm regards


                            Ufopolitics
                            Principles for the Development of a Complete Mind: Study the science of art. Study the art of science. Develop your senses- especially learn how to see. Realize that everything connects to everything else.― Leonardo da Vinci

                            Comment


                            • Originally posted by Ufopolitics View Post
                              Hello Kogs,


                              On this Diagram that you have shown, I have chosen P2 and P10 as the Motoring Energized Pairs (not like I normally do, starting by P1...plus Pn set around 180º) sorry about this.

                              The Orange intermittent line represent the Related Pairs (P1/P10) Contacting Commutator Elements with Brushes, which are set exactly at Stators Dead Center or Stators Bisectors.

                              The Green Line represents the Generating Elements making contact with Brushes.

                              Does Your Motor have Brushes set at Stators Bisectors?....They should be like that.

                              The Main point you should have in mind...is that each Coil must grab Four (4)Poles, so the Pair will grab a total of Eight(8) Poles...and the Pair Opposed by 180º will close the 360º Quadrant (16 poles) by adding the other Eight (8) Poles.

                              This number of Total Poles Machines like 16, 20, 28...are simple...as they are divisible by Four.

                              The complication arises when we have 21...or 33 Poles...but I have that issue taking care off...


                              Warm regards


                              Ufopolitics
                              G'day UFO
                              I do not know how the comm's were set as when I pulled the motors apart it included the comm's and so now I place them wherever I like I will peer into the diagram further.
                              Does that mean that I can run the motor either way
                              Thanks for your quick reply
                              I am now preparing to finish all my motors ASAP and show the results

                              Thanks a million

                              Kogs trying hard

                              Comment


                              • Ccw

                                UFO

                                This is what I have


                                Midaz
                                Last edited by Midaztouch; 10-09-2013, 11:06 PM.

                                Comment

                                Working...
                                X