
Tube
Hey Aaron
can I good understand how tube works ?
C1 is full charged (in Your case to 2microF 4000V cap so maximum it is 16J) the electrons go to the HV rod and throught the spark they go to the mesh and coil (load coil) to charge cap C2 in Your case 1000V . When C1 i charged to 4000V and C2 1000V it is good enought for green flash, right ?
Btw. what distance U have between copper rod and mesh ? It can be about 1mm? = 3kV breakdown voltage (1,3mm=4kV, but air in the tube may be get ionizated so the breakdown voltage can be lower)
I have very similar configuration but I cannt get green flash. (I have carbon, maybe thats problem) I have distance between rod and mesh about 5 mm, but I soldered wire (wire is about 1mm from the rod) to get sparks betwen rod and mesh. Both C1 and C2 I have charged... I will continue in my work...
Do I good understand or I am really wrong ?
Thank for anyhow advice.
Antena
-
Spokane1, Any libraries around? They usually have computers for people to use.
-SteveLeave a comment:
-
Tuning Procedure for Nail Comb Experiment
Dear Ghst,
Thank you for the detailed tuning procedure recommendations. I shall make adjustments along those lines during my next experimental session.
I would love to see your YouTube presentation, however I live in the country on a slow dial up. At work YouTube is blocked. One of these days I'll get a laptop and use the WiFi at Starbucks. Until then I can only follow your advancements via description, photos, and diagrams. - which I enjoy very much.
I'm working towards reproducing the long white streamers that your circular Jar apparatus was able to produce. I have never seen an automotive iduction coil produce such a display. I believe you are on to something that needs to be followed up on in more detail. I can only work at a snails pace.
Spokane1Leave a comment:
-
Spokane1, That looks good. But you need one of the caps wire connected directly to the LV electrode. Then just play with the electrode spacing, For my 2000V .9 uf cap to discharge it needs to be spaced 3/8" to 1/2"above the spark gap line.You wont the spark line to run to the yellow cap wire, (you may have to move it a little closer). once the HV is jumping the gaps to the yellow capacitor wire, start easing the LV electrode in starting at about one inch. You want to see whisper sparks (Lightening) jumping occasionally to the spark gap. When the cap charged to the dielectric break down voltage of the gap it will discharge. The closer the LV gap the faster the discharge rate. You'll have to tinker a bit to get the optimum spacing from the LV electrode to the multi spark gap. Be Careful!Originally posted by Spokane1 View Post
I think this shows how I have the cap connected.
YouTube - Multiple spark gap using brass 3Last edited by Ghst; 06-01-2009, 08:07 PM.Leave a comment:
-
end caps
Hi Steve,
I just drilled holes barely big enough so that the copper rods were a super tight fit...so yes, just fit tight in the end caps.Leave a comment:
-
Gray tube construction
Hey Aaron,
How did you support you rods within the grids such that they'd be centered? Did you use spacers between the rods and the grids or did the way you connected the rods to the endcaps provide enough support? I guess you wouldn't have fixed them firmly to the endcaps since you needed to adjust spacing.
Thanks
SteveLeave a comment:
-
Replication Nail Comb Experiment
Here is a simple replication of the Nail Comb Experiment. So far, with these connections I haven't been able to charge the capacitor. But, this setup was just assembled and needs to be explored in more detail.Originally posted by Ghst View Post
The capacitor is 1.0 uf at 2KV. The motor is running at 600 RPM with a resulting 60 Hz pulse rate. Snubber Capacitor is about .02uF. The LV Anode is 0.250" copper rod 3-1/2 inches long. Diodes are 15 KV 4Amp Microwave devices. Nails are 22 each #17 x 1-1/4 Wire Brads spaced 3/16" apart in a block of PlexiGlas. Coil is a MSD "Blaster 2". The attached meter is a 3KV Electroscope with a resistance of 10**15 Ohms.
The photos were taken with no flash to enhance the view of the arc.
Spokane1Leave a comment:
-
Brass & Nylon Setup
Here is the video of the Brass and Nylon washer setup with the carbon fiber LV electrode.
YouTube - Brass Nylon 2Leave a comment:
-
Went to HomeDepo bought 2' long 10- 24 nylon screws. Also purchased some #8 nylon washers and some #8 Brass washers. The Brass and comb test led me to this. (I added some wire via round hole eyelet connectors).
I then poked two holes in another Plastic Jar , thru the top and bottom center.
I am testing a carbon fiber arrow shaft cutdown for the LV electrode.
I put a alligator clip on the wire (outside the jar) then pulled the wire tight thru the jar and put another alligator clip on the wire to hold the rigs position.
The first running was a success! I need to know how large I can get with the washers and how many is optimum. Vids are comming.

Leave a comment:
-
Tube
Hi
my schematic is like Your on - howthegraytubeworks.jpg
Both capacitor I have 1microF 4000V.And I dont have coil between C1 and diode(In future I will put coil here to protect diodes).
Now I watch Your video carefully. I ignore the fact that first I have to charge C1 and through HVrod I need to have spark to the mesh(and coil) to charge C2.When both are charged I have to close S1...Hope I good understand.
That means that I need to have rod more closely to mesh to charge C2. Load coil is coil between C2 and mesh(maybe it can be lamp bulb etc...).
Btw I dont know how to give here picture.
Thnx a lot for Your valuable videos and good advice to me
AntenaLeave a comment:
-
gray tube
I can get the effect without any grid at all. The grid can be substituted with a single point so you have a three point system. It can work with a 2 point setup as well depending on the circuit setup.Originally posted by antena View Post
The carbon isn't necessary for the effect either but may make the effect stronger. I finally have a good local source for carbon and will test this later when I have time.
Antena, would you mind posting your exact schematic?
What do you mean by loading the coil? Just by having the coil in series with the capacitor's discharge, the coil will charge with the effect.Leave a comment:
-
6A100 Diodes
I bought all my 6A100's from Mouser.
Mouser Electronics - Electronic Component Distributor
I've been really happy with them for
this Gray Tube project and all the
water sparkplug circuits.
Also, they are MUCH cheaper than buying
single large diodes...just put them in a
string and they still wind up cheaper.Leave a comment:
-
Source of cheap 6A100 diodes
Yesterday I purchases 7 6A100 diodes (actually their NTE equivalent) for $4.88 each from a local store. Today I found 6A100 diodes at $0.22 each for quantities over 100 from www.westfloridacomponents.com.
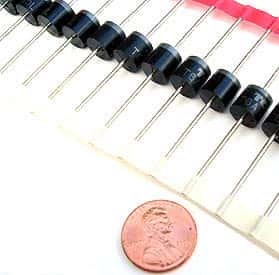
So I ordered 200 of them (I can also use them in my Hyde generator.) You can bet I'll be returning the $4.88 ones to the store on Monday! Just thought I'd let you guys know about this cheap source before you waste a lot of money like I almost did.Leave a comment:
-
mesh
Hallo
hmm... I got spark about 1mm (its about 3-4kV)but still no green...no sparks between rod and copper tubes. Its important to have mesh(still have perforated coper tubes...) over low anode with carbon too ?
Its important the load- coil or it can be lamp or tube ?
Thank a lot
AntenaLeave a comment:


Leave a comment: