Announcement

Collapse
No announcement yet.

Splitting The Positive

Collapse
X
 
  • Filter
  • Time
  • Show
Clear All
new posts

  • Splitting The Positive

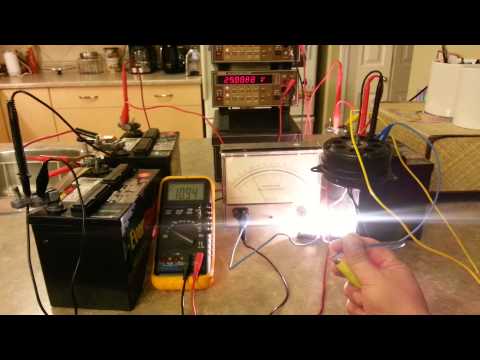
    This thread will be for beginners who never witnessed the
    BASIC FREE ENERGY circuit as shown by John Bedini.

    After we understand this portion of the study we can
    move on to a more complex study with additional feature
    that can result in an even higher COP.

    First we will look at the most basic function of splitting
    the positive to show how easy it is to use energy by
    recirculation.

    Some who claim advanced status can not verify these
    simple results, what does that mean? It means that
    many are not as advanced as they might like everyone
    to think.

    I am trying to learn this myself and I think this video
    is quite clear so I have come aside to post video's
    on splitting the positive or what I think qualifies as
    "SPLITTING THE POSITIVE.

    I didn't want to cludder up Turion's more advanced thread
    with these beginner video's. Many experimenters, including
    Dave and Matt have shared these basic ideas.

    If the video's I post are incorrect I am sure the advanced
    students with point this out.

    All of this said so that this foundational concept can be verified
    in spite failed attempts by "SO CALLED" "ADEPTS"?


    Last edited by BroMikey; 06-06-2020, 09:38 PM.

  • #2
    We can't leave out the HV to LV type of "SPLITTING THE POS..."

    By EV Gray

    You are not going to understand it all yet. Stay tuned.


    [VIDEO]https://www.youtube.com/watch?v=6dAegVJyCFo[/VIDEO]

    Comment


    • #3
      Take One--------------SPLIT THAT POS............

      [VIDEO]https://www.youtube.com/watch?v=OJSkPLvRFh8[/VIDEO]

      Comment


      • #4
        Take Two

        But who really understands what he is doing with the ENERGIZER/Genny?

        [VIDEO]https://www.youtube.com/watch?v=ElNFASw6GB8[/VIDEO]

        Comment


        • #5
          Diagrams

          Comment


          • #6
            Hi mike, thanks for sharing.
            This works also.
            The load in-line with series cap. dump, may need to be tuned though, to allow for similar discharge and charge voltage drops and gains in battery.
            I had to change my circuit to 2 bulbs in parallel there, as originally it worked fine with one, until it blew and maybe that bulb had somewhat different values than the other 12 volt bulb.
            peace love light

            Last edited by SkyWatcher; 06-01-2016, 12:34 AM.

            Comment


            • #7
              other side

              Originally posted by BroMikey View Post
              Diagrams

              That's the right diagram as far as what Bedini originally showed but in the first video you posted, he is putting the load of the light and motor between the negatives instead of between the positives. At least, that is what it looks like.
              Sincerely,
              Aaron Murakami

              Books & Videos https://emediapress.com
              Conference http://energyscienceconference.com
              RPX & MWO http://vril.io

              Comment


              • #8
                Originally posted by Aaron View Post
                That's the right diagram as far as what Bedini originally showed but in the first video you posted, he is putting the load of the light and motor between the negatives instead of between the positives. At least, that is what it looks like.
                Aaron you are correct, the light is between the negatives and the DC motor is across the single 12 volt battery. I did it like that because it worked both ways.

                Dave Wing
                Last edited by jettis; 06-01-2016, 04:09 AM.

                Comment


                • #9
                  splitting the negative?

                  Originally posted by jettis View Post
                  Aaron you are correct, the light is between the negatives and the DC motor is across the single 12 volt battery. I did it like that because it worked both ways.

                  Dave Wing
                  Hi Dave,

                  Was that you vid?

                  If you place the bulb between the negatives, the current still moves in the same direction. You could almost call it splitting the negative but it doesn't change anything. There are variations of different circuits that use the differential between the negatives but is not identical to this 3 battery method - I'll share one at the conference, which is based on an obscure patent that nobody seems to know about.
                  Sincerely,
                  Aaron Murakami

                  Books & Videos https://emediapress.com
                  Conference http://energyscienceconference.com
                  RPX & MWO http://vril.io

                  Comment


                  • #10
                    Originally posted by jettis View Post
                    Aaron you are correct, the light is between the negatives and the DC motor is across the single 12 volt battery. I did it like that because it worked both ways.

                    Dave Wing
                    Originally posted by Aaron View Post
                    Hi Dave,

                    Was that you vid?

                    If you place the bulb between the negatives, the current still moves in the same direction. You could almost call it splitting the negative but it doesn't change anything. There are variations of different circuits that use the differential between the negatives but is not identical to this 3 battery method - I'll share one at the conference, which is based on an obscure patent that nobody seems to know about.
                    It is hard to find much at all on this subject. No I didn't
                    spot that he was using the negative. Thanks guys, I am digging
                    for gold but very little exists on the subject


                    http://www.icestuff.com/~energy21/battery.htm


                    [VIDEO]
                    https://www.youtube.com/watch?v=Y_ata6Kmng4[/VIDEO]
                    Last edited by BroMikey; 06-01-2016, 10:19 AM.

                    Comment


                    • #11
                      Originally posted by BroMikey View Post
                      Diagrams


                      My Experiments with the above circuit.

                      Please note I believe the experiment was first performed by John Bedini
                      John Bedini's website

                      I first heard of it from I first heard of it from Jerry Decker Keelynet website.

                      Components

                      3 six volt batteries and connect as in diagram as above.

                      One everyready industrial 6 volt battery

                      And two cheaper sweda brand 6 volt batteries.

                      I doubt batteries brand make any difference.

                      One filament lamb globe rated at six volts.

                      Day one

                      Connected batteries as per circuit.

                      Although the diagram does not seem to make sense the bulbs are actually connected to positive terminals.

                      The lamp globe lit brightly for approximately one hour and then began to dim gradually and continued to do so.

                      I left the light bulb connected for approximately for four hrs from 6.30pm to 10 .30 pm

                      I though that by disconnecting batteries and rearranged them I could get more power out.

                      Found bottom 6 volt battery total dead and was unable to continue the experiment.

                      Day Two

                      Replaced the apparently dead battery and tried the experiment again

                      The globe glowed bright for approximately 1 hr and then started to dim as per day one..

                      I left the globe in placed and there was a glow of decreasing intensity for 24 hrs and then the small glow present in lamp was unable to be observed coming from the light bulb....

                      Disconnected all batteries and left for 6 hours. Overnight.

                      The batteries were placed on top of a 51 cm TV and the Television in standby mode overnight.

                      No discernable connection was made between batteries and the TV

                      Day Three

                      Tested all batteries separately and found all still held a good charge and lit the 6 volt globe. when connected across each of the battery terminals in turn..

                      I expected to find one battery total dead as per first day.

                      Two batteries glowed the bulb to a lesser degree than the third battery.

                      Reconnected batteries in the same circuit as before and at present observing reasonable bright glow.

                      Will see how long the globe will remain lit.
                      Day Four
                      The batteries combination and globe has been lit from 8.30pm until 2.00 am the next morning the brigthness of globe seemed not to dim and remained at constant intensity.

                      By touching the light bulb with hand does not seem to be heating up as is normal with ordinary bulb and touch battery setup.

                      The colour given off by light bulb seems to more of a copper red light and not the normal white bright light.

                      These claims are difficult to prove as I have no light measuring apparutus to make accurate measurements.

                      I awoke at 2.am and found the brightness had decreased and so I disconnected the light globe from circuit at this time and checked one battery and it seemed dead.

                      I have also noticed interference appearing on a television set nearby (approx 2 feet away) during operation of said circuit.

                      The interfernce does not seemed to affect our local transmitters reception situated approx 5 kilometers away from us.

                      But seems very pronounced on TV channels on distant channel reception on channels 7 9 and 10 The picture and reception on these channel is almost crystal clear but an annoying cracking noise and a pattern that could be caused by a high voltage discharge or a faulty switching faulty relay seems to be causing the interference,both which we don't have here.

                      It seems to have effected reception on channel 9 the greatest

                      To receive the distant TV channels we have 60 foot antenna and booster equipment and this normally enables reception on most but not all nights a good reception from these distant TV transmitters.

                      The three channels are located in our state capital Adeliade approx 200 kilometers from us although the distance is propably shorter cross country.

                      Channel seven has frenquency of 181-188 megahertz
                      channel nine has a frequency of 195-202 megaherts
                      channel ten has a frequency of 209-216 megahertz

                      Australian TV stations are transmitted in The Pal format.

                      The television set mentioned is a 51 cm Panasonic TV.

                      Day 5
                      At approx ten am following morning checked all batteries with light globe placed on each individual terminal an again and found all batteries have a charge enough to put out normal white glow of bulb.

                      The white light from each battery does not seem to have been reduced in strength from previous day

                      Reconnected circuit as before and found globe is still glowing although brightness is not as great as previous day and seems to be only a pin pick at centre of filament.

                      after three hours the globe is still burning
                      Day Six and seven

                      It appears my observation that the battery setup was causing interference to the TV of previous day was incorrect.

                      The batteries were not connected for some time and interference has continued so it seems interference is coming from some other source.

                      The battery circuit is now only glowing very dimly and so was disconnected,

                      I connected the three batteries in parallel and left for six hours without a load across terminals.

                      Connected batteries as per circuit illustration above and bulb again glowed for approx 7 hrs and as so went dim gradually again.

                      Disconnected the batteries and left to stand for 8 hrs.

                      Recharged battery in parallel setup again for 6 hrs

                      Tested the Blue battery by itself by connecting globe across blue battery (in photo) terminals and tested to see how long battery and globe together glowed.

                      The result the lightbulb glowed for approxiamately 6 hrs and gradually reduced light output strength over this time period until battery seemed exhausted.

                      Tried to recharge battry using parallel connection as previously mentioned. result not encouraging and now consider this battery is know totally dead and useless.

                      The other two batteries remain still holding a charge and the light bulb glows about 1/3- 1/2 strength of brightness when placed across each set of battery terminals as compared to when the batteries were brand new.

                      Experiment has now concluded.

                      From my observation it seems that something interesting is happening

                      Normally I would have expected all batteries to be totally dead after 6-12 hrs but this was not the case.

                      What I�m not sure ,but I encourage you to the experiment for yourself.

                      If you have performed this experiment yourself I would like to know what your results were.

                      Author of this article

                      Please make copy of article and pass it around to intereted friends media etc

                      Geoff

                      Comment


                      • #12
                        If anyone is interested I found a diagram to help with these
                        experiments where series parallel connections are made for
                        running and for charging.

                        So you can switch back and forth. These picture form diagrams
                        reveal trolling motor setups already in use as 3 battery systems
                        so this is a practical test in a boat for all who have the extra
                        small batteries and a boat.


                        These 3 battery systems are tapped into the negative and could
                        just as easily be arranged for split Pos...... Operations


                        Comment


                        • #13

                          Test one


                          Test one should be done with all batteries in parallel with
                          measurements done as shown. 1 amp at 13vdc and declining
                          equally 13 watts 13 joules per second or 13 X 60 seconds=
                          780 joules per minute.

                          Remove amp gauge during runs, only use at periodic intervals
                          because ammeters eat power and have an energy consumption
                          curve all of their own. We want a less complex calculation.

                          Then record how long it takes to drop the battery voltage to 11 vdc
                          under load which would probably be a 12vdc battery resting voltage, for
                          a fully discharged battery pack.

                          Record runtime.


                          Test Two

                          Test two run batteries down to 22dvc collectively on the right
                          side or the 26vdc fully charged bank.

                          Record the runtime.


                          Test number two should show a marked increase in runtime as all
                          energy in the loop is being used to charger the single 13vdc battery
                          on the left as well as power the load.

                          The only discrepancies will be

                          #1) Over charging and losing power in the first single 13vdc battery
                          thru resistance and over heating so make sure it is a big enough
                          battery and the load being powered is small

                          #2) Also monitoring of relative brightness from hour to hour during
                          cycle times, measure voltage dropping off curve.

                          If you know your battery as i have been taught by the best
                          John Bedini, you will know one way or another if you are gaining
                          any advantage by counting JOULES.

                          Batteries discharge X amount of joules per second or minute
                          count your many joules they are like blessings
                          .

                          Last edited by BroMikey; 06-05-2016, 02:05 AM.

                          Comment


                          • #14
                            Test Three in this case is using the split pos...... evolution with
                            a boost converter at the Motor (Not a light as in test 1 &2)

                            We have the advantage by have a bug in our ear to correct us

                            Gotta have a booster when running small motors.

                            I love to copy answers off the next guys page. Sweet.

                            Now I feel like a cheat!! I really never thought about

                            hooking my boosters up with 2 positives, that is against book

                            smarts you know.


                            Last edited by BroMikey; 06-05-2016, 02:38 AM.

                            Comment


                            • #15
                              Originally posted by Turion
                              I have tested several different boost converters. Their efficiency ranges from 87-98% efficiency, so choose wisely when selecting one. We have posted the correct wiring schematic for the boost converter several times. A standard boost converter has a positive and negative in and a positive and negative out. So there are four wires, NOT two as you have shown here.

                              A COP>1 device is possible with average components. Matt's motor raises the COP. A more efficient boost converter raises the COP. ADJUSTING the output Of the boost converter raises the COP. Having rested batteries to rotate into the setup raises the COP. Batteries that have been charged OR discharged like to rest before you mess with them. We have gone over ALL of this before but no one listens. Hope you have better luck.
                              Thanks that is what I am doing right now "Brain storming booster converter"
                              connection diagrams for my SSSG which is already a very high COP device.
                              Thanks 4 that be right back with your diagram and Matts motor info.

                              I will begin to dump circuits here BRB


                              Last edited by BroMikey; 06-05-2016, 04:22 AM.

                              Comment

                              Working...
                              X