Announcement

Collapse
No announcement yet.

Motor Generators

Collapse
X
 
  • Filter
  • Time
  • Show
Clear All
new posts

  • Bye is still licking his wounds the scaredy cat that he is, for all his crimes. If I was Bye Id'e be chicken-little too. He should be ashamed of himself

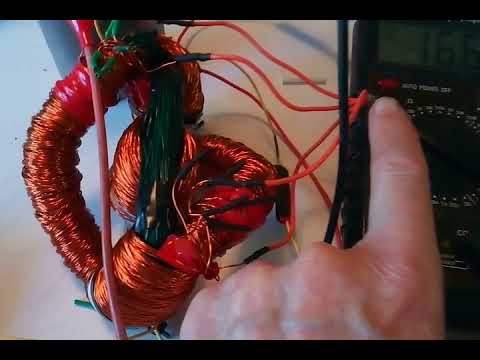
    BTW not 2 change the subject here is a solid state motor generator called a BiTT @ Overunity which is almost the identical tests I got (1.5-2 COP) I did and got the same results with iron cores at 60hz Thanks Doug

    I followed Bil Alek and made my 2 secondaries the same which they then cancelled, to as near to zero as possibly, where the input drops right down. A phase conjugate mirror


    Last edited by BroMikey; 01-10-2022, 06:15 AM.

    Comment


    • Originally posted by BroMikey View Post
      Here in this video, the solution to the principle of the acceleration module of the "Earth engine". In general, it's ingeniously simple

      https://youtu.be/dmJROB0tFQ8?list=PL...ZTDlCnZdFATOva

      Comment


      • Originally posted by Turion View Post
        bi,
        Unfortunately, the end of the bolt that contained the nut was recessed in the plastic, accessible only by a deep socket. I did manage to get the OTHER end of two of the bolts out far enough to cut the heads off with a Dremel tool, which requires far less effort than using a nut splitter. I have one, but the nut was not out far enough to get it on the nut. Dremel worked better. The only trick was holding the Allen end of the bolt in place. To do that I had to put a 12" crescent wrench on the Allen wrench to give me the leverage I needed to hold it in place while turning the nut with a socket. And I wan't using the crescent wrench in the normal manner.....stuck the Allen through the hole in the handle of the wrench, and used the wrench as a lever.
        OK. Rather awkward design using recessed nuts like that. My plan B would have been to drill out the tapered heads. The hex hole would give a .281" drill an easy start. Just drill into the bolt diameter and push it out.

        bi

        Comment


        • Originally posted by bistander View Post

          OK. Rather awkward design using recessed nuts like that. My plan B would have been to drill out the tapered heads. The hex hole would give a .281" drill an easy start. Just drill into the bolt diameter and push it out.

          bi
          Okay Dave here it is "TODAY'S LESSON' Bye has now officially given his expert advice. You should have drilled it out? Why didn't I think of that? yeah Dave you should have drilled it out and next time "no recess" Dave.

          Bye, is really turning out to be a great help, don't you think?

          Comment


          • A true master mechanic will share the torque chart with the beginners in class. See chart
            https://www.fandisc.com/uploads/8/4/...orque_orig.gif
            You have a grade 3 bolts and might have been lied to about that. The chart says to stay under 40 psi so anywhere from 25 - 35 psi and often not that high for junk steel.

            See chart grade 8 bolts are 100-120 psi. These are specs for a 1/4"-20 bolt. The bolt price for good steel is a few cents more. Cast steel bolt threads are like cast steel pipe threads. Once cross threaded you have a nightmare.

            China sells both cheap cast steel bolts and high grade. Like cheap drills and higher grade cobalt drills. If you ever got stuck with those cheesy drills you have your answer of what not to buy.
            Last edited by BroMikey; 01-10-2022, 11:40 PM.

            Comment


            • Recessed nuts were required so the belt drive didn't hit nuts sticking out the back of the machine or the bolts they were on either. The adjustment bolts that MUST stick out the back to be usable were a higher priority. Hard to work the belt arrangement out to avoid ALL of them. The nuts were recessed on purpose.

              I thought about drilling out the bolt head, which was also inset, but if any PART of it remained, it would have been recessed and impossible to access easily. That would have been a nightmare. The bolt shaft with a chunk of the head still attached wouldn't go down the hole and would have caused me even MORE headache. I would no longer have had a place for the Allen wrench to go into, holding the bolt while I attempted to back the nut out with the socket set. I would have been reduced to trying to drive the bolt out the hole with some kind of punch and hoping the piece of the head that was still attached bent out of the way or broke off. I considered all of this. So drilling the bolt out became plan C. If I couldn't back the nut out far enough to cut the head off because the Allen "hole" stripped out, I would have been forced to drill it. As it was, cutting the head off took about the same time as drilling it would. Time lost was backing the nut off far enough to get the head of the bolt clear enough to cut off. And it still left me with the drilling option if it wasn't successful.

              Today's project...

              https://youtu.be/fNmIhOOUOfc
              Attachments area
              Preview YouTube video Coils


              Coils
              “Advances are made by answering questions. Discoveries are made by questioning answers.”
              —Bernhard Haisch, Astrophysicist

              Comment


              • All I have to say is you got lucky but most of all you did the right thing. Drilling out red hot metal bolts sitting in plastic is a big no no.that hole would have melted sideways. thx 4 sharing all your hard work. The excitement is building

                Comment


                • it cost $350 for just the wire for 12 coils. An entire box build would be in the thousands, it would be well worth it $500 for magnets?

                  https://www.ebay.com/itm/37069094534...0AAOSwzc1brp-b
                  Last edited by BroMikey; 01-11-2022, 05:18 AM.

                  Comment


                  • The ultimate obvious discussion

                    Comment


                    • TEMCo 23 AWG Copper Magnet Wire - 10 lb 6268 ft 200°C Magnetic Coil Winding
                      One coil is enough for 6 strands at 1,000 feet per strand, or TWO coils. To create 12 coils you need SIX spools at $104.00 with free shipping from Amazon. That's more like $624.00 for just the wire for 12 coils. BELIEVE me, I know. I've gone through several sets of coils where I had to throw the whole SET of coils away because they got too hot with those iron cores. Shorted out. You will have about 1,600 feet of wire left over


                      12 of these https://www.magnet4less.com/neodymiu...untersunk-hole @ 3.95 = $47.40
                      24 of these https://www.magnet4less.com/super-st...-x-1-8-in-disc @ $ .86 = $20.64
                      48 of these https://www.magnet4less.com/super-st...-4-in-cylinder @ $6.45 = 309.60 plus $25 shipping
                      About $402.00 for magnets

                      For magnets and wire, over $1,000.00


                      But you know, it doesn't work, so I have built like 17 versions of this just because I like to spend money.
                      Last edited by Turion; 01-11-2022, 08:40 AM.
                      “Advances are made by answering questions. Discoveries are made by questioning answers.”
                      —Bernhard Haisch, Astrophysicist

                      Comment


                      • Originally posted by Turion View Post
                        TEMCo 23 AWG Copper Magnet Wire - 10 lb 6268 ft 200°C Magnetic Coil Winding
                        One coil is enough for 6 strands at 1,000 feet per strand, or TWO coils. To create 12 coils you need SIX spools at $104.00 with free shipping from Amazon. That's more like $624.00 for just the wire for 12 coils. BELIEVE me, I know. I've gone through several sets of coils where I had to throw the whole SET of coils away because they got too hot with those iron cores. Shorted out. You will have about 1,600 feet of wire left over. ​​​​​​...
                        ​​​​
                        For magnets and wire, over $1,000.00


                        But you know, it doesn't work, so I have built like 17 versions of this just because I like to spend money.
                        Can you help me understand how you connect your coil as Tesla style bifilar using three 1000' strands?
                        bi

                        Comment


                        • oops I must have been in a hurry when I made that money error. On the 6 strand version Dave puts some of his coils 3000 feet in series and some of it parallel. Tell me if this is right Dave. 1000ffft = 500+500 used in series then he does that 2 more times. Then each 1000ft are put in parallel. This means that each 1000 feet gives 500ma at the said voltage for a total of 1500ma at said voltage.

                          The coil sets of 2 did put out 200w-450w depending on the cores and the magnets on the rotor. Personally I will make a guess of 400w per coil set this time or this version. Even at 350w per coil set comes to over 2000w. The drive motor is way cheaper than that to run and that is not possible I am told

                          Comment


                          • When it came time to settle on a coil configuration for this machine we had several different core materials and wire configurations we wanted to compare.
                            Iron rods
                            Shotgun shot
                            some material my buddy in Florida found
                            Metglass
                            Nanocrystaline
                            Permalloy
                            Ferrite

                            That is seven different materials. For each one of these materials we wound two coils with 24 strands of 125 feet. Two coils with 12 strands of 250 feet. Two coils with 6 strands of 500 feet and two coils with 3 strands of 1,000 feet. In case you’re counting, that took 28 spools of wire to wind 7 materials x 4 configurations x 2 coils divided by 2 coils per spool is 28 spools at $104.00 per spool just to test core materials.

                            We posted ALL those results here over the course of a few months of testing. We saw NO BENEFIT to the Tesla style coil as long as we ran at the CORRECT frequency for the coil. For the 3 strand coil it is 2800 RPM, which was my ORIGINAL coil configuration. That is what we will be using.
                            “Advances are made by answering questions. Discoveries are made by questioning answers.”
                            —Bernhard Haisch, Astrophysicist

                            Comment


                            • Originally posted by Turion View Post
                              Iron rods
                              Shotgun shot
                              some material my buddy in Florida found
                              Metglass
                              Nanocrystaline
                              Permalloy
                              Ferrite

                              28 spools at $104.00 per spool just to test core materials.
                              the 3 strand coil it is 2800 RPM, ........is what we will be using.
                              Dang dude you are a lifesaver, all that money down the drain and your big heart just gives away all of the research answers free. You are a sweet man, it is no wonder you rage when the foolish come around looking the gift horse in the mouth.Chief man/ servant to all. Nobody does that, I mean nobody.

                              I got to thinking how the comparison between your coil design and Thanes come out. Thane does the same thing by using 3 strands but his are so short and can run 5 amps all day long he puts the 3 short strands in series.

                              Thane runs 3600-3800rpm vs 2800 rpm or 1000 rpm faster. This is approx. 30% faster. Thanes coil voltage target is 75vdc under load plus 5% and your original cores and coils put out 120vac which is 150vdc. This means Thanes target voltage for the e-bike is 50% less than Daves generator box.

                              Why do I bring that out? Simple, because their is a correlation between speed, length of wire for a specific target voltage. I am trying to make the connection.
                              Last edited by BroMikey; 01-11-2022, 05:11 PM.

                              Comment


                              • Originally posted by Turion View Post
                                When it came time to settle on a coil configuration for this machine we had several different core materials and wire configurations we wanted to compare.
                                Iron rods
                                Shotgun shot
                                some material my buddy in Florida found
                                Metglass
                                Nanocrystaline
                                Permalloy
                                Ferrite

                                That is seven different materials. For each one of these materials we wound two coils with 24 strands of 125 feet. Two coils with 12 strands of 250 feet. Two coils with 6 strands of 500 feet and two coils with 3 strands of 1,000 feet. In case you’re counting, that took 28 spools of wire to wind 7 materials x 4 configurations x 2 coils divided by 2 coils per spool is 28 spools at $104.00 per spool just to test core materials.

                                We posted ALL those results here over the course of a few months of testing. We saw NO BENEFIT to the Tesla style coil as long as we ran at the CORRECT frequency for the coil. For the 3 strand coil it is 2800 RPM, which was my ORIGINAL coil configuration. That is what we will be using.
                                So Turion,
                                Do I understand correctly? You say that you are not using bifilar coils on your lastest generator? That your are using a conventional winding of three strands in parallel?
                                bi

                                Comment

                                Working...
                                X