Announcement

Collapse
No announcement yet.

Barbosa and Leal Devices - Info and Replication Details

Collapse
X
 
  • Filter
  • Time
  • Show
Clear All
new posts

  • Hello Clarence. Your new shop cart layout sounds ideal. When you tried wider ground rod spacing initially, I would guess it was with less ground rods. The stuff about having a minimum of 6 feet spacing for ground rods is not just theory, as it is widely in practical use in the electrical power industry. They use this because it has been long since well established that it provides a lower resistance connection to earth ground. I am working on my own experiments right now in a different area, but I will be following along with how you and others are progressing in your experiments.
    Happy experimenting everyone!
    level

    Comment


    • Winding the secondarys

      Hello Luc2010,

      I have attached again the photo of a correctly wound toroid.

      It is important that you set the toroid in front of you with the primary lead wires on the right side of you and the open space of the core directly in front of your chest.having done that then look at the photo of the correctly wound
      secondary coil and that is what it should look like when you are through

      both the secondary windings are to be done exactly the same.

      when you go to hook the wires together they ARE NOT HOOKED IN A FIGURE EIGHT. keep doing that and you will smoke a couple more of them.

      the two TOP WIRES HOOK TOGETHER!

      The two BOTTOM WIRES HOOK TOGETHER!

      that should eliminate your problems for you.
      Also keep the windings TIGHT UP AGAINST the core
      to make everything work effectively. and tye wrap them in place!!
      sloppy work gives sloppy performance!

      thanks.

      Clarence
      Last edited by clarence; 03-26-2016, 04:14 PM.

      Comment


      • Hello Clarence,

        Could you also describe again the primaries connections (toroid black wires connected together and white together or black to white wires) ?

        Many rhanks

        Comment


        • How to connect primary toroid leads

          Originally posted by cheors View Post
          Hello Clarence,

          Could you also describe again the primaries connections (toroid black wires connected together and white together or black to white wires) ?

          Many rhanks
          Hello,

          to restate all the connections:

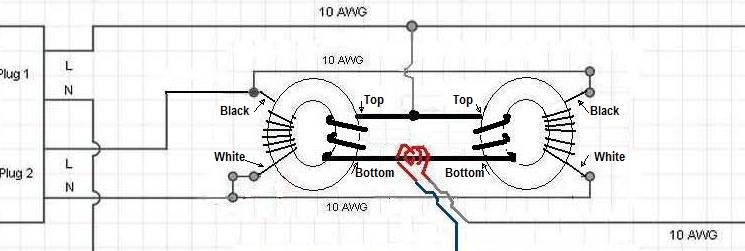
          the top TWO #4AWG black wires connect to EACH OTHER.

          the bottom TWO #4AWG wires Connect to EACH OTHER.

          with regard to the primary lead connections:

          the L lead of one toroid will be connected to the L lead of the other toroid.

          the N lead of one toroid will be connected to the N lead of the other toroid.

          when these connected leads are powered up you should use a clamp meter set on AC AMPS and see a reading of around 1.0 to 1.4 amps.
          somewhere close depending on what type of toroid you use.

          thanks

          Clarence

          Comment


          • Originally posted by clarence View Post
            HELLO,

            I have repeatedly told members that they simply FAIL TO GRASP the context
            of a good part of the information that I put before them and it still remains true! the information that some keep harping on was ALREADY COVERED
            IN A PREVIOUS POST!!!!!!!!!!!

            I'll recover it in a VERY BASIC kindergarten level so that perception might REIGN!
            1. I stated that I had noticed an intermittent problem
            2. 2. I stated something that I thought could ALSO (not entirely) have
            contributed to the problem.
            3. 3.I stated that I KNEW how to cure the problem and was going to do so.
            4. family reasons(relatives) and local conditions have prevented me from
            doing ANYTHING TO DATE!
            5. If you think I am going to rush out to do something that is disruptive to
            myself and my personal environment just to satisfy someones personal
            whim-------you better think AGAIN!

            I will do what I need to do as it fits my needs - not yours - now GET OFF IT!

            Go BACK to PAGE 2 POST #44 and put some real eyeballs on!


            Clarence
            Ladies and Gentlemen

            If I may let me introduce to some of the engineering crowd a revised
            winding document of industry standards from Tortran
            (Toroidal Transformer AKA Tortran)

            This is a compilation of 3 of Clarence picture drawings.

            Only the exciter section is shown in this 3 part series.

            This might add to our bank of schematics to help
            visualize both primary and secondary winding
            with their opposing winding directions.


            Last edited by BroMikey; 04-19-2015, 09:03 AM.

            Comment


            • schematic mistake

              Originally posted by clarence View Post
              Hello,

              to restate all the connections:

              the top TWO #4AWG black wires connect to EACH OTHER.

              the bottom TWO #4AWG wires Connect to EACH OTHER.

              with regard to the primary lead connections:

              the L lead of one toroid will be connected to the L lead of the other toroid.

              the N lead of one toroid will be connected to the N lead of the other toroid.

              when these connected leads are powered up you should use a clamp meter set on AC AMPS and see a reading of around 1.0 to 1.4 amps.
              somewhere close depending on what type of toroid you use.

              thanks

              Clarence
              Bromikey,
              According to what Clarence posted, you have the #4AWG wire connected wrong in your schematic. That would make both windings around the toroids in the same direction would it not? Bottom connected to bottom, top connected to top. I could be wrong. That's how I see it. Clarence do you mean with the toroids laying flat or as the schematic is pictured?

              ????
              wantomake
              Last edited by wantomake; 04-19-2015, 04:09 AM.

              Comment


              • Grounding Discs (for power installations)

                Originally posted by level View Post
                Here is an earlier hand drawn schematic from Clarence from March 19, 2015:

                ---------------------------------------------------------------------------

                Re: Energy from the Ground - Self powered generator by Barbosa and Leal
                « Reply #1043 on: March 19, 2015, 05:29:32 AM »

                Clarence:

                I attached the new block schematic of my improved unit.
                It will remain in this form for a long time As it is very simple! It has way less components and is therefore more cost effective!
                It also Has produced a unit that IS SELF POWERING!!!!!!

                at present I have found out today that my present 20 rod return grid is not cutting it! I have 10 more rods coming in tomorrow and
                I will be installing these soon to bring my rod total to 30. after that I will test and post some info about both the components ID and
                where to get them, etc.

                I will get into the self powering aspect later also. for now just KNOW THAT IT IS VALID!

                thanks and cheers!

                Clarence

                ---------------------------------------------------------------------------
                Hi Clarence,
                I have ground discs that are meant for utility transformer grounds. They are pure copper discs with a lug mounted to them. If you wish, I will list them on Ebay for sale. I recommend you excavate deep enough because steel rods coated with copper are awful. I would first off dig as Kapanadze did, maybe 6 -10 ' deep. Bury the ground, then, back fill with more conductive ,material. Pour salt water in the ground as you backfill it to eliminate resistance from the soil and make sure it is tamped well to keep the moisture. Anyway, before you put the ground plates in the ground, you can buy an anti oxidant electricians and linemen use called Penetrox. They sell a copper compound base penetrox.. It's a bit expensive, but, if you want good grounding, it's your best bet. The ground discs I have are $44 each. I recommend putting a very wide distance grid in your yard deep down and connect them all together for best results. Then, I would make the system a 240 system and get a larger battery bank and larger charger if you do the whole breaker box. What the hell, if you get free power, you may as well go all the way and get off the grid all together.

                Anyway, if interested, I have two boxes of the discs for sale. Now that I see you are having good luck, I will keep 8 of the discs for myself. How many would you need? They aren't huge, but, they are good for a utility pole that has a 15kVA transformer on them. They drop 2 of these at the base of a pole to utilize. These are used when ground rods are not an option, bad grounding due to sand , ledge, rocks, etc. It's best to get these into a layer of clay as far as you can down and be 100% sure it is moist by nature, but, adding conductive salts and compounds with water are critical at times.

                Good luck,
                Marc

                Comment


                • Originally posted by wantomake View Post
                  Bromikey,
                  According to what Clarence posted, you have the #4AWG wire connected wrong in your schematic. That would make both windings around the toroids in the same direction would it not? Bottom connected to bottom, top connected to top. I could be wrong. That's how I see it. Clarence do you mean with the toroids laying flat or as the schematic is pictured?

                  ????
                  wantomake

                  Yes I am wondering if this last drawing is perfect. Thanks for flagging me on this entry and will can change it if needed. This is the purpose of repeating the drawings so we are all very sure.

                  According to Clarence last post the 4awg winding are wound one clockwise and the other counter clockwise from top to bottom and the wires on the bottom connect straight across and the wires on the upper portion connect straight across to each other. No crisscrossing of wires please.

                  This is the way i see his post and If I am wrong Clarence will correct me.

                  Here is the latest full Clarence schematic.


                  Comment


                  • @all supposed we do what kapanadze did by burying water filled car radiator made of copper in the ground , will it not serve a goid earthling?

                    just thinking, thanks

                    Comment


                    • Originally posted by wantomake View Post
                      Bromikey,
                      According to what Clarence posted, you have the #4AWG wire connected wrong in your schematic. That would make both windings around the toroids in the same direction would it not? Bottom connected to bottom, top connected to top. I could be wrong. That's how I see it. Clarence do you mean with the toroids laying flat or as the schematic is pictured?

                      ????
                      wantomake
                      Hello Sir,

                      You are correct sir! when you set BOTH of the correctly wound torroids
                      before you having their #4 wires pointing STRAIGHT at you then simply SPIN one towards the other --- with BOTH LAYING FLAT ------ then connect tops to tops and bottoms to bottoms. its simple !

                      thanks for jumping in!!!!

                      @ BroMikey ,

                      be advised you need to correct - good work tho.

                      Thanks Both,

                      Clarence

                      Comment


                      • Originally posted by clarence View Post
                        Hello Sir,

                        You are correct sir! when you set BOTH of the correctly wound torroids
                        before you having their #4 wires pointing STRAIGHT at you then simply SPIN one towards the other --- with BOTH LAYING FLAT ------ then connect tops to tops and bottoms to bottoms. its simple !

                        thanks for jumping in!!!!

                        @ BroMikey ,

                        be advised you need to correct - good work tho.

                        Thanks Both,

                        Clarence
                        Originally posted by wantomake View Post
                        Bromikey,
                        According to what Clarence posted, you have the #4AWG wire connected wrong in your schematic. That would make both windings around the toroids in the same direction would it not? Bottom connected to bottom, top connected to top. I could be wrong. That's how I see it. Clarence do you mean with the toroids laying flat or as the schematic is pictured?

                        ????
                        wantomake

                        Okay try it now.
                        I have been looking at these toroid's for years, "cross eyed" and now for the first time I see it clear. Don't I?

                        Thanks for the correction.
                        Last edited by BroMikey; 04-19-2015, 08:58 AM.

                        Comment


                        • Originally posted by maxolous View Post
                          @all supposed we do what kapanadze did by burying water filled car radiator made of copper in the ground , will it not serve a goid earthling?

                          just thinking, thanks
                          Look closely at Clarence working rod system. 4 sending rods and 56
                          receiver rods. What you are talking about does not apply to a tested
                          system, just some possibilities that might work on something.

                          Clarence is showing a proven system not an experimental
                          Hodge Podge of theoretical mysteries that could take years
                          to perfect.

                          Nice try tho, and Clarence thought of it.

                          Mikey

                          Comment


                          • Finally, primaries are in phase
                            Secondaries are in phase.
                            That's the trick: no big current in the loop when iddle.

                            Comment


                            • Originally posted by cheors View Post
                              Finally, primaries are in phase
                              Secondaries are in phase.
                              That's the trick: no big current in the loop when iddle.
                              Thanks for the validation Cheors, I finally got it after all these years
                              Last edited by BroMikey; 04-19-2015, 09:16 AM.

                              Comment


                              • Originally posted by BroMikey View Post
                                Thanks for the validation Cheors, I finally got it after all these years
                                Hello Bro,

                                LOVIN IT! LOVIN IT!
                                just remember it is difficult to have a drawing show what is apparent in real life!
                                that is why I decided to attach the real life photo of what you are doing to help members too.
                                your'e good.

                                thanks ,

                                Clarence
                                Last edited by clarence; 03-26-2016, 04:14 PM.

                                Comment

                                Working...
                                X